Some of the links on this site are affiliate links. I make a small commission from sales when you click through the link. There is no additional cost to you.
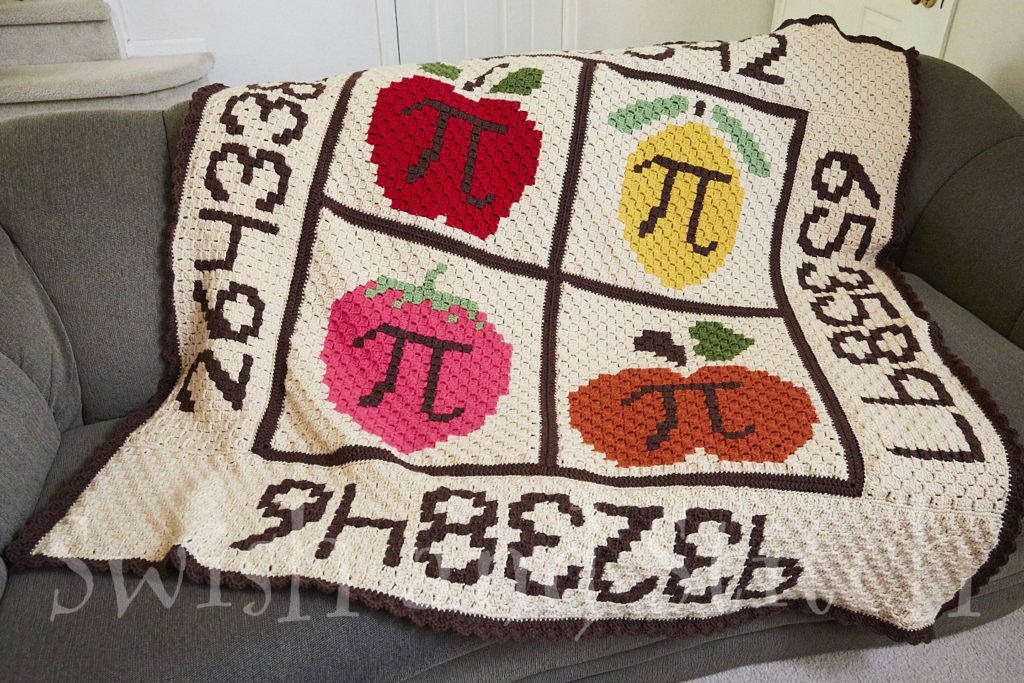
Finishing the Fruit Pi C2C Crochet Afghan
Are you ready for some Fruit Pi, or fruit pie, whichever you prefer? Pi Day is just around the corner and there’s just enough time to get this Fruit Pi C2C Crochet Afghan finished before it. And if it’s as cold wherever you are as it is in Colorado, you’ll definitely want this afghan to cuddle in as you indulge in your lemon chiffon or homestyle pumpkin or—my favorite—razzleberry pie as you celebrate.
For more math fun, don’t forget to check out the full Fruit Pi C2C Crochet Afghan PDF pattern available in my Etsy shop. It includes 8 fruit pi blocks—apple, lemon, strawberry, pumpkin, peach, pear, plum, and cherry—as well as 8 alternate pi blocks. Each block has a printable chart and printable line-by-line instructions. That’s 16 Fruit Pi blocks and 4 Digits of Pi border panels for one low price!
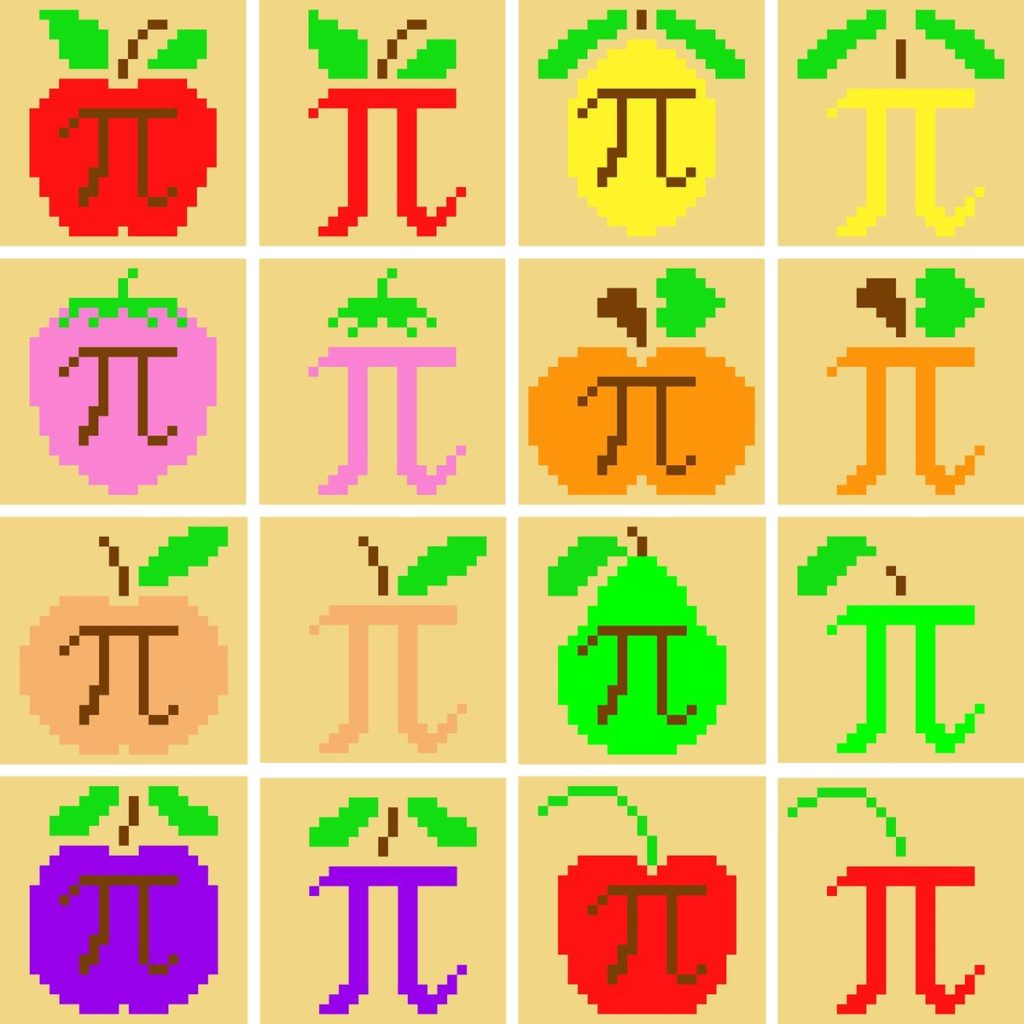
All right. You’ve got all your blocks ready: Apple Pi, Lemon Pi, Strawberry Pi, Pumpkin Pi, Digits of Pi Border 1, Digits of Pi Border 2, Digits of Pi Border 3, and Digits of Pi Border 4.
Each of the fruit blocks should have already been edged in a row of double crochet in CHOCOLATE. If you have not done this yet, return to one of the fruit blocks and follow the given instructions. Do not edge the Digits of Pi borders in chocolate.
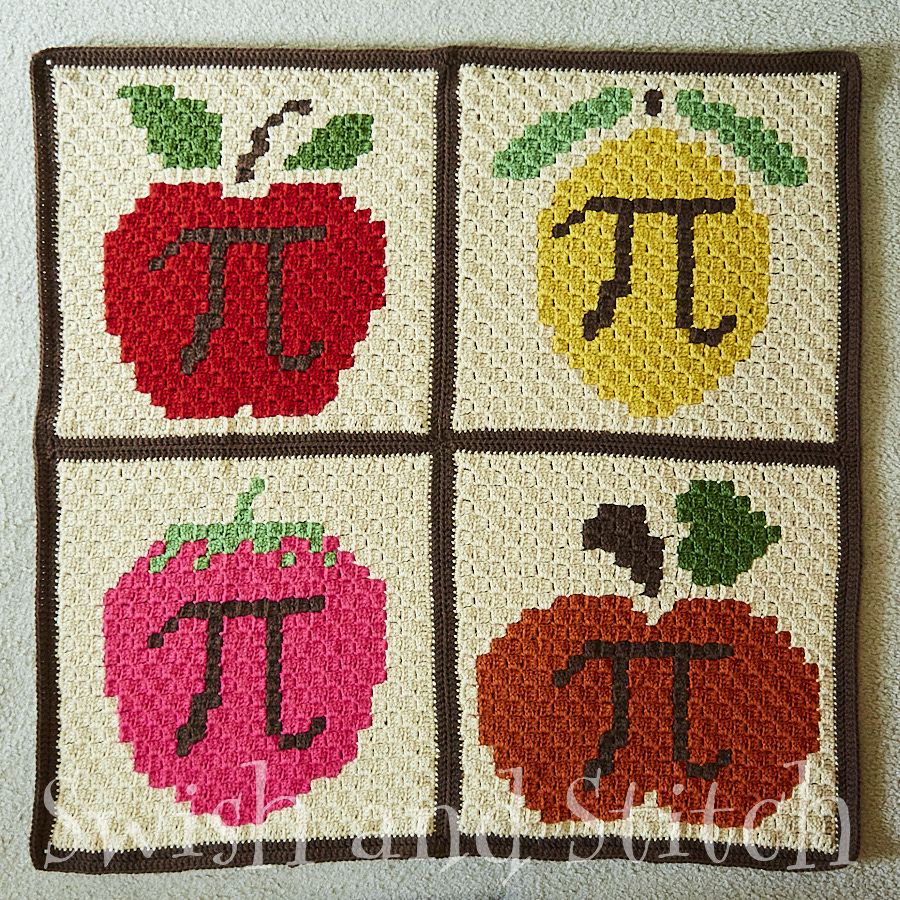
Assembling the Center Block
You may, of course, lay out your fruit pi crochet blocks in whatever order you wish. If you want your blanket to look like the sample I’ve stitched, lay them out in this order
Row 2: Strawberry Pi, Pumpkin Pi
Whip stitch Row 1 together using CHOCOLATE yarn. Whip stitch Row 2 together using CHOCOLATE yarn. Then, whip stitch the two rows together, again using CHOCOLATE. The inner 2 X 2 square of your blanket should look as shown below.
Now, add an additional CHOCOLATE sashing row around the joined fruit blocks.
- With the right side of blanket facing you, attach CHOCOLATE yarn into any double crochet stitch from the previous row using a double crochet.
- Double Crochet (DC) 1 in each stitch to the end of the row.
- In the corner stitch, work DC 2, Chain (CH) 2, DC 2.
- Repeat steps 2-3 until you have crocheted around the entire block. You may want to add additional DC stitches where the blocks are joined to create an even row.
- Slip stitch into the top of the first double crochet. Fasten off.
Completing Assembly of the Fruit Pi C2C Crochet Afghan
Use this diagram for reference when completing assembly of the afghan. You’ve got to get the digits of pi in the proper order or undoubtedly someone will correct you.
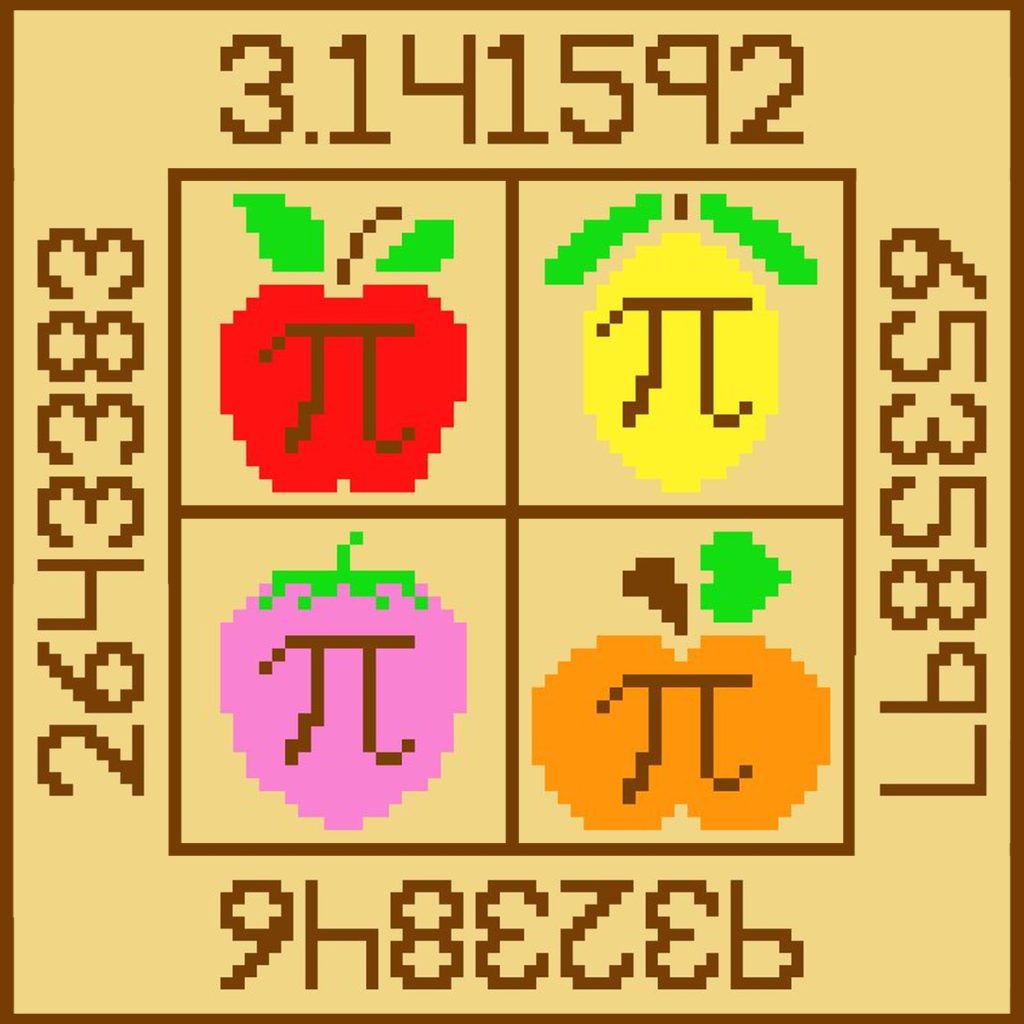
Add your Digits of Pi Border panels in the following order.
- Whipstitch the Digits of Pi Border 2 to the right side of the afghan using BEIGE. TIP: When adding a long panel, use large binder clips to hold the panel in place while stitching.
- Whipstitch the Digits of Pi Border 4 to the left side of the afghan using BEIGE.
- Whipstitch the Digits of Pi Border 1 to the top of the afghan using BEIGE.
- Whipstitch the Digits of Pi Border 3 to the bottom of the afghan using BEIGE.
Isn’t this great? All that’s left is to add the final border.
Adding the Final Border
When I was deciding on the border for this pi crochet blanket, it was an easy decision. It had to be a scalloped edge! It’s for a “pie” after all. This simple edging is reminiscent of a crimped pie crust.
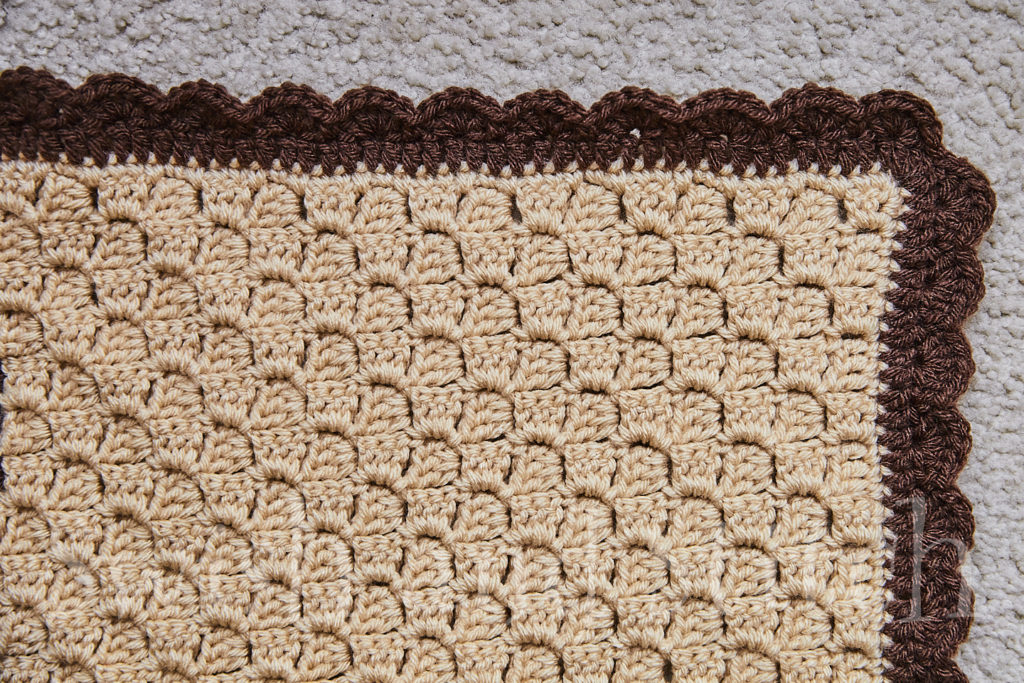
For the second border row, you need to know the shell stitch.
Shell Stitch
Skip one stitch. In the next stitch, work 5 double crochet (DC) stitches. Skip one stitch. Single crochet (SC) in the next stitch.
Math (optional) 🙂
NOTE: For the shell stitch to work out evenly, you need a (multiple of 4) + 1 stitches on each side of your afghan.
I lucked out.
I had 209 stitches (counting from the third DC stitch in one corner and counting through the second DC stitch in the next corner) along the top and bottom edges.
209 – 1 = 208
208 / 4 = 52
I had 52 shells on the top and bottom edges of the afghan.
Is this too much math? Let’s do it again for the sides.
I had 213 stitches (counting from the third DC stitch in one corner and counting through the second DC stitch in the next corner) on each side of the afghan.
213 – 1 = 212
212 / 4 = 53
I worked 53 shells on each of the sides.
If your stitches don’t work out perfectly or you don’t want to do the math, No WORRIES! You can always just crochet along and fudge a stitch or two, if necessary, at the end of each row.
Border Row 1
With right side facing, join CHOCOLATE yarn in any stitch with a DC. DC 1 in each SC to the end of the row. In the corner stitch, work 4 DC. Continue in like manner around the entire block. Slip stitch into the top of the first DC. Finish off.
Border Row 2
With right side facing, join CHOCOLATE yarn with a slip stitch in the third DC in any corner. *Work shell stitch across the side, ending in the second DC in the next corner. Slip stitch in next stitch.* Repeat from * to * two more times. Finish off.
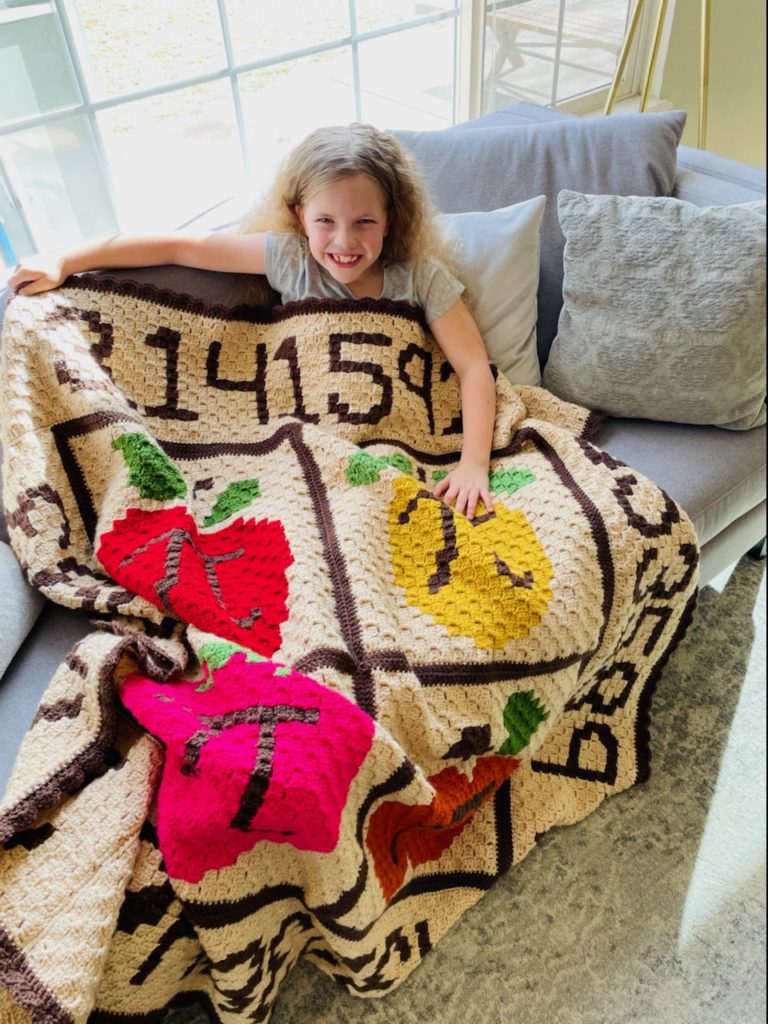
Now step back and admire your amazing accomplishment! I mentioned in Fruit Pi C2C Crochet Afghan that we have some friends who were the inspiration for this blanket. This is one of them!
If you worked in the same gauge that I did, your final blanket should measure roughly 60 inches square. I’d love to see your finished afghan! Send me pics and let me know if this is for you (math nerds welcome here!) or for a geeky friend.
Enjoy!