Some of the links on this site are affiliate links. I make a small commission from sales when you click through the link. There is no additional cost to you.
Fairy Gardening Basics
I admit, I don’t enjoy yard work very much. There are a few exceptions. I don’t mind doing a bit of spring cleaning—cutting back dead leaves and sticks on the perennials—and choosing the flowers and other plants that go in our yard. Fortunately Cory is willing to do the rest—the mowing, the fertilizing, the weeding—he’s awesome!
I think it’s because the weeding and mowing, etc., just feels like upkeep, while choosing the plants and where they go is more like art. And I think that’s why I like fairy gardening. It’s art.
Keep Your Fairy Garden Simple
There are some stunning images of elaborate fairy gardens on the internet. It you look at some of those, you may feel a little overwhelmed. Especially if the artist handmade all of her houses and accessories. Someday I may try some of that, but for now, I keep things simple. I like quick and easy—maximum rewards for minimum effort!
Keeping things simple is especially important if you are designing fairy gardens with young children. They may not have the fine motor skills to make their own houses and benches, but they will certainly have an opinion if you tell them they can design a garden any way they wish!
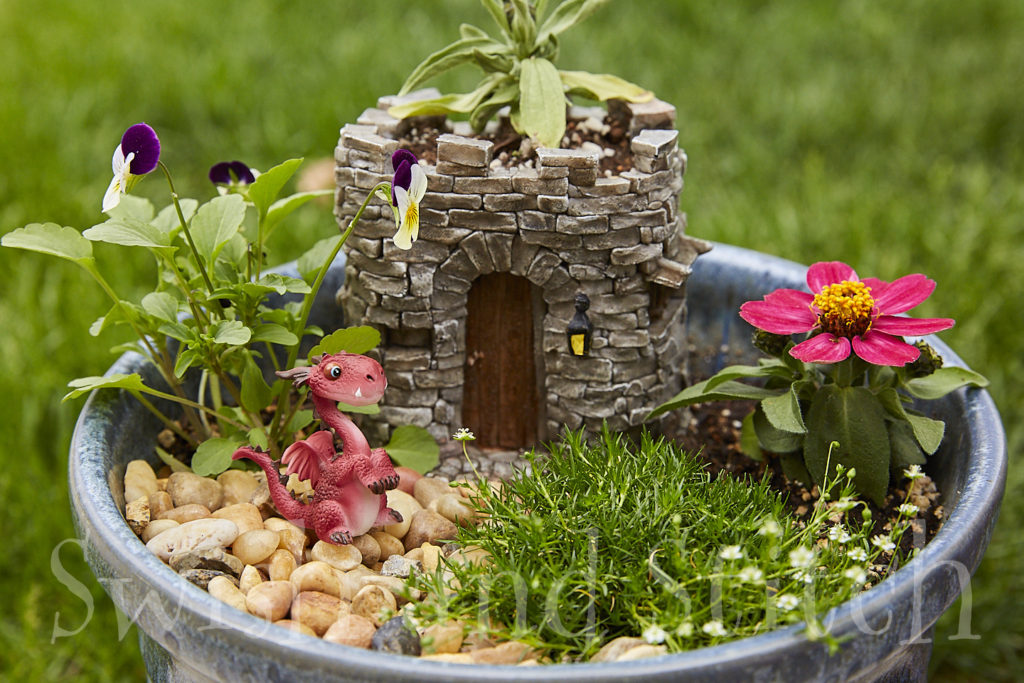
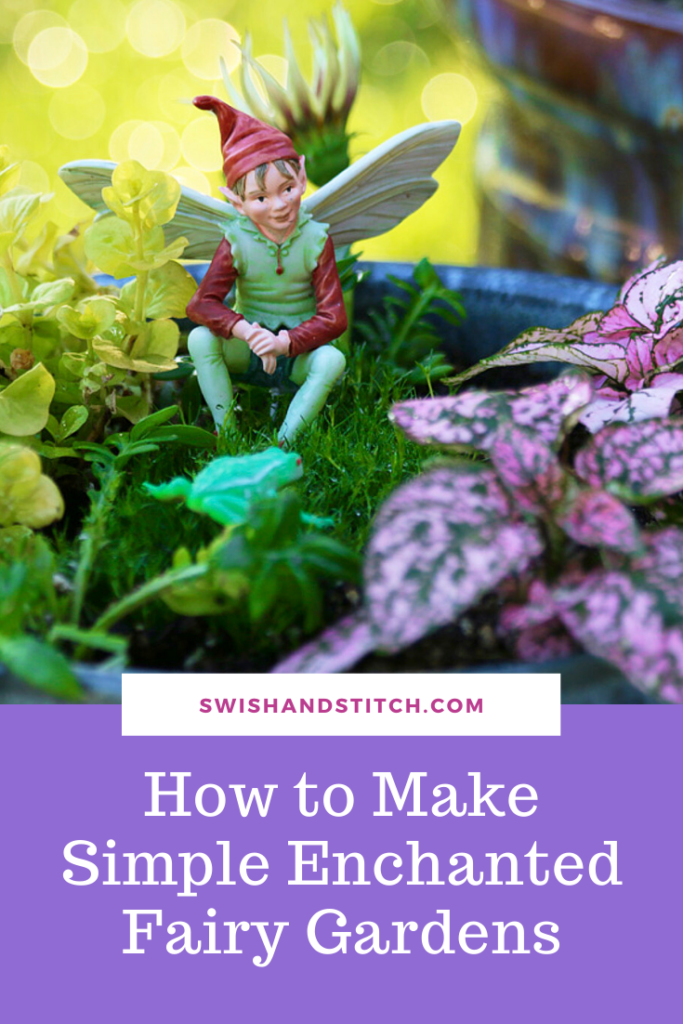
This fun fairy garden has just enough room for a tiny dragon and castle. Both were given to me by my daughter BRizzle for Mother’s Day this year. Thanks Darlin’! I love them!
Questions to Ask Before Making Your Fairy Garden
There are lots of decisions that go into making a fairy garden. I’ll list a few of them. You don’t have to answer all of them. But, if you and your kids really enjoy making fairy gardens, you may want to consider them as you branch out for future gardens.
- Where will the garden be located?
- Will it be an indoor garden or an outdoor garden?
- Will your fairy garden be in the sun or the shade?
- Do you have a green thumb, or are artificial plants more your style?
- Do you want a traditional container or something more eclectic like an old bathtub, boot, or birdbath?
- What feelings do you want your garden to inspire?
- Do you want a nostalgic, sweet garden reminiscent of your childhood, a modern, minimalist garden, or a creepy, haunted garden?
These are just some of the questions that you could think about to make your fairy garden completely personal and unique.
For this tutorial (keeping it simple, remember?), I will show you how to make an outdoor container (pot) fairy garden that will be placed in full sun.
Simple Step-By-Step Instructions for Your Enchanted Fairy Garden
1. Choose a Theme
A theme is not absolutely necessary, but it helps you tie your garden elements together for a cohesive look. A childlike fairy painted in pastel colors might not look quite right next to a townhouse painted in bright color blocks. But it’s your choice! If that’s what appeals to you, go for it! Remember, you are the artist!
I like to have a theme that tells the story of my fairies. Some common themes include:
- An enchanted forest
- A beach scene
- A fairy tale castle
- A rustic retreat
- A miniature city
- A lush backyard
Your theme may determine the fairy and the accessories you purchase. Of course, you can always work the other way. You may fall in love with a particular fairy, house, or gazebo and work from there to define your theme. It’s fun to just go browse in your local craft store and see what’s for sale and what ideas start swirling in your brain.
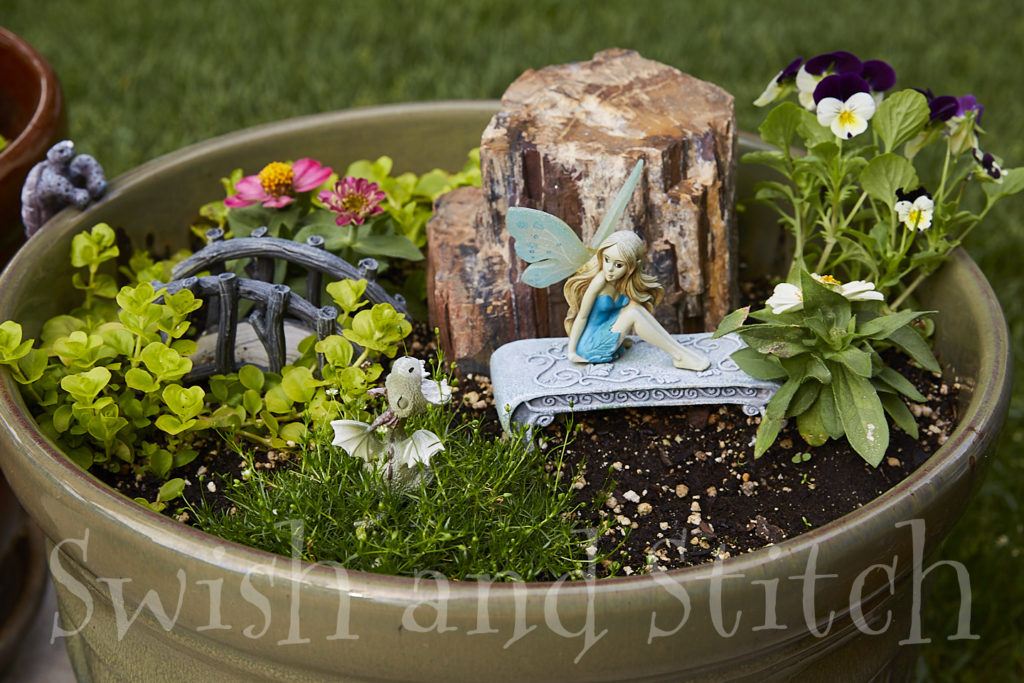
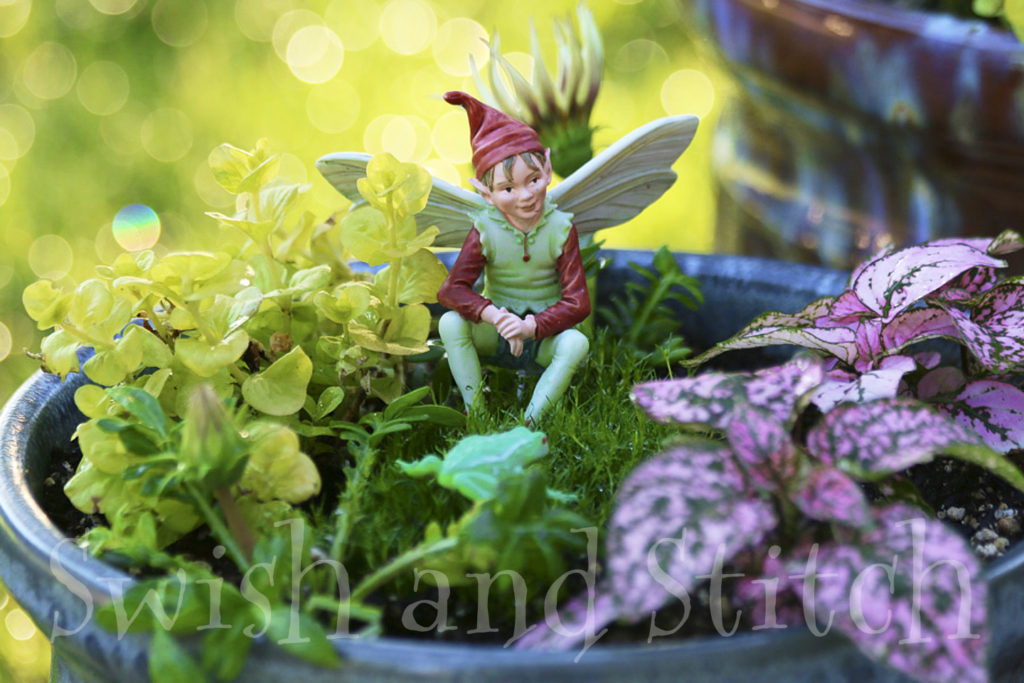
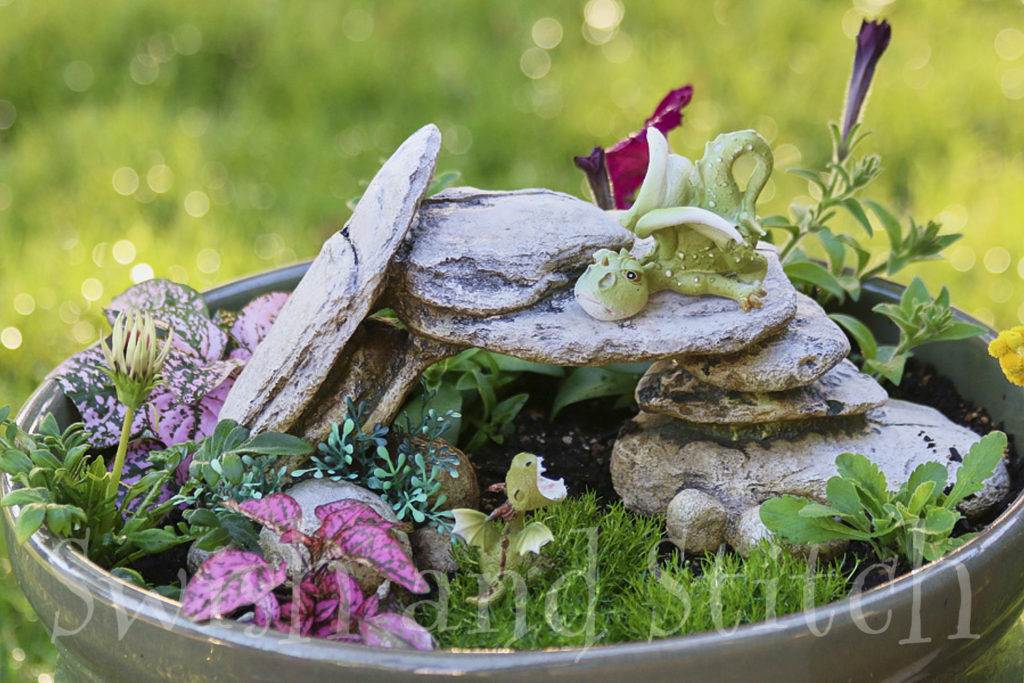
2. Choose Your Focus, Your Fairies, and Your Accessories
When a friend looks at your garden, what do you want him to see? In a small pot garden, it is best if there is one main focal point. Generally, I use one or two fairies (or dragons or bunnies or trolls or whatever) and use furniture, houses, bridges, animals, and other elements to complement the fairies and flesh out their story.
I especially like it when my fairy has something to look at or if an action is implied. It makes the garden more vibrant.
- A fairy in the forest could be watching a doe and her fawn.
- A fairy in her yard could be planting a garden or having a tea party.
- A fairy prince could be offering a rose to his sweetheart in front of a tiny castle.
- Two fairies could be chatting over a fence.
- A fairy could be chasing a bunny near a stream.
- A fairy could be sitting quietly on a bench reading a book.
Or, if you inclination runs to characters other than fairies:
- Harry Potter could be casting a spell.
- Hermione Granger could be mixing a potion.
- Han Solo could be battling a Stormtrooper.
- A Lego genie could be granting wishes.
- A lioness could be protecting her young.
- Two gorillas could be traveling through the forest.
- A hobbit could be standing in front of his hole.
- A spaceship could be crash-landed in a swamp.
This is my favorite part! And I bet it will be yours too! Let your imagination run wild, helped along by all the fairy garden accessories available.
If you find yourself wondering where to find fairy garden accessories, the answer is ANYWHERE! Nurseries, craft, and online stores will have lots of options, but don’t limit yourself to traditional or obvious answers.
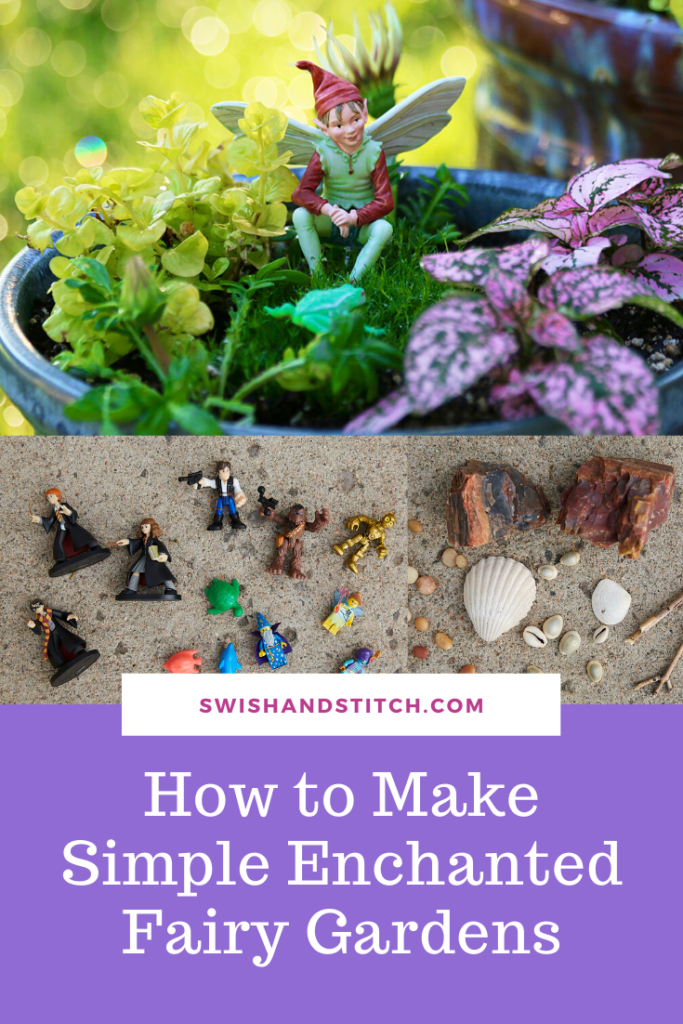
The Toy Box
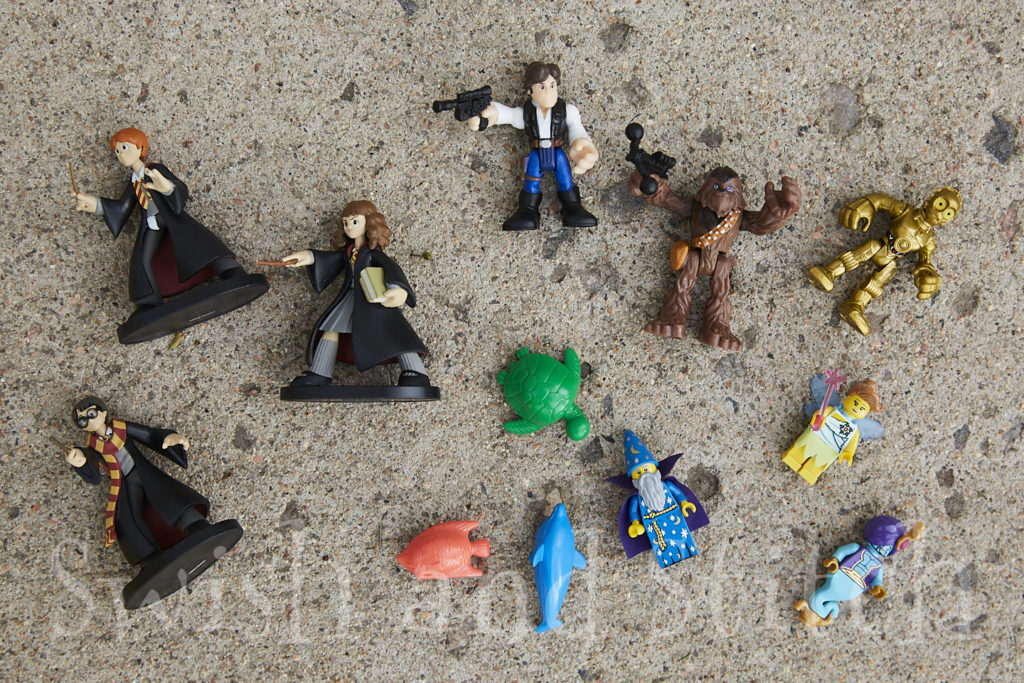
Let your kids dig through their toy boxes for ideas—small action figures, plastic animals, cars, and even LEGO elements are all worth considering. Just know that they may fade or rust in the sun and rain, so don’t use anything that your kids are sentimental about. You can spray them with a sealer which will slow the fading, if you wish.
A Tackle Box
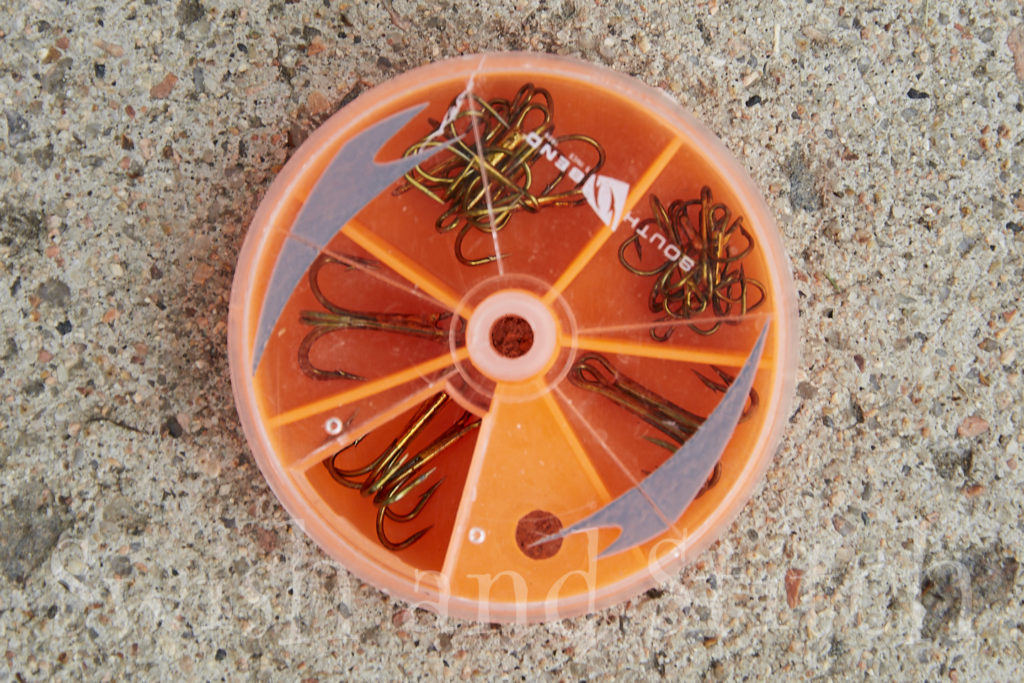
You read that right. A tackle box. Google “miniature chandelier from fish hook” and you’ll see why. With a three-pronged fish hook, some beads, wire, and jewelry findings, you can make a perfect fairy-sized light fixture for a house or gazebo. When I showed this idea to Cory, he bought me fish hooks for Christmas. 🙂
Your Craft Bin
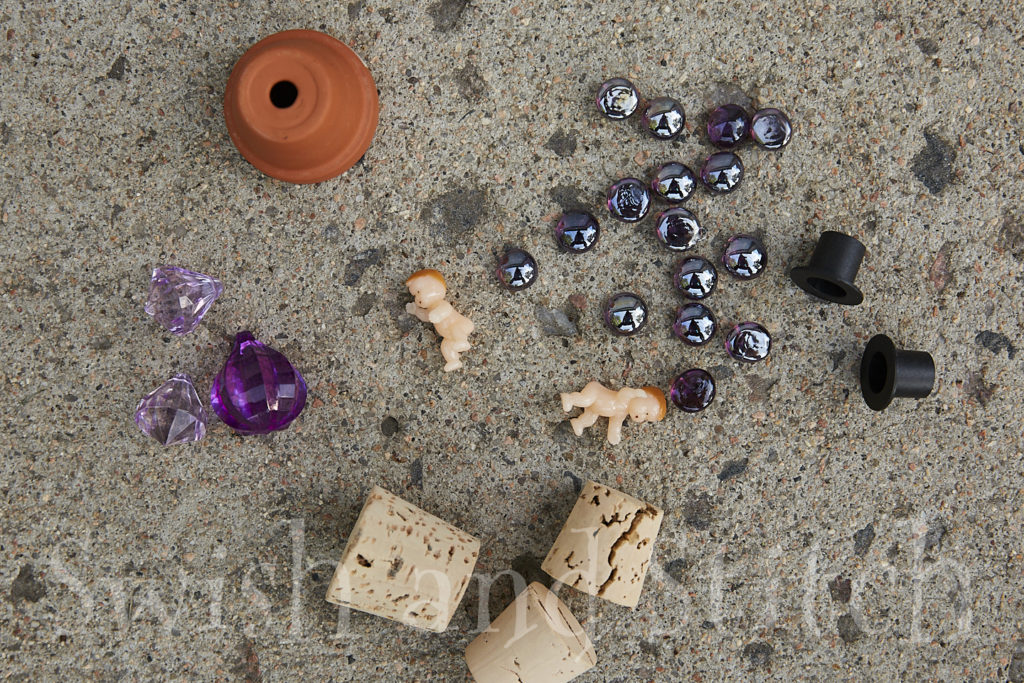
If you’re a crafter and have leftover supplies, let your kids sort through all that potential treasure. Popsicle sticks could be wired together to make a fence. Glass gems could become stepping stones or a dragon’s hoard. I even have a tiny foam top hat that would look dapper on the right fairy.
The Pet Store
One of my favorite places to shop for large fairy garden elements is the pet store. Yes, the pet store! Every “tree” and “cave” that I’ve used in my enchanted forest fairy gardens has been either a reptile perch or an aquarium decoration.
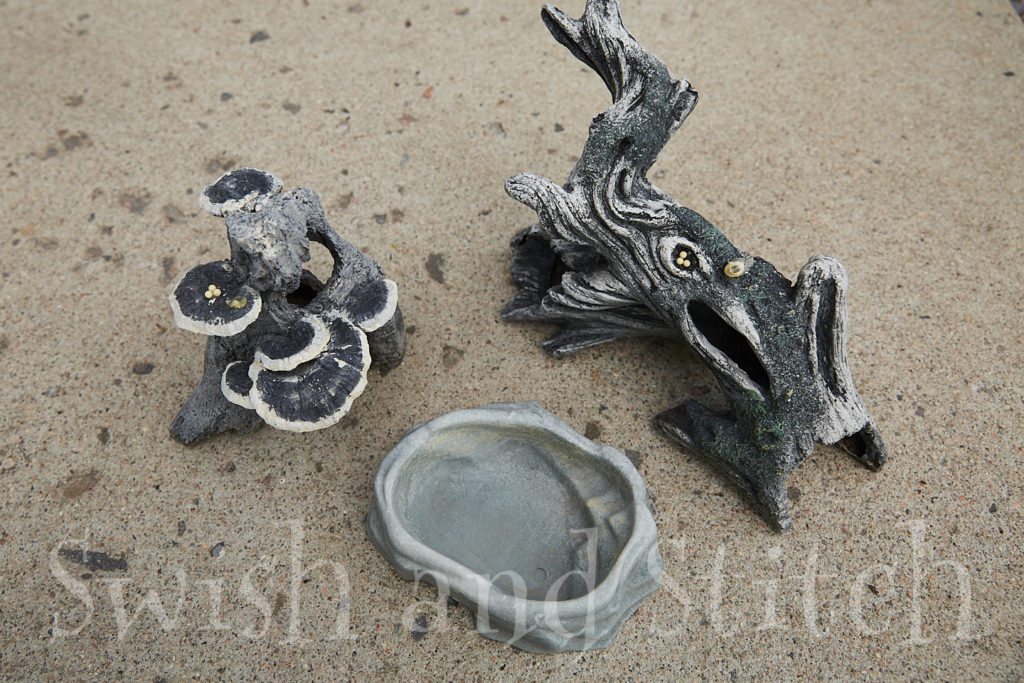
Seriously, aquarium ornaments are so fun to look through! There are logs and stumps and stone outcrops that can be used for a forest or other natural setting, but don’t stop there! There are pirate ships, battleships, coral formations, Greek ruins, tiki heads, skulls, pagodas, and treasure chests.
I would love to get a coral formation and try a beach or mermaid scene.
Or a large castle and add Harry Potter, Hermione, and Ron. 🙂
The pet ornaments and perches may still fade in the sun, but at least you know that anything intended for an aquarium can handle a little rain!
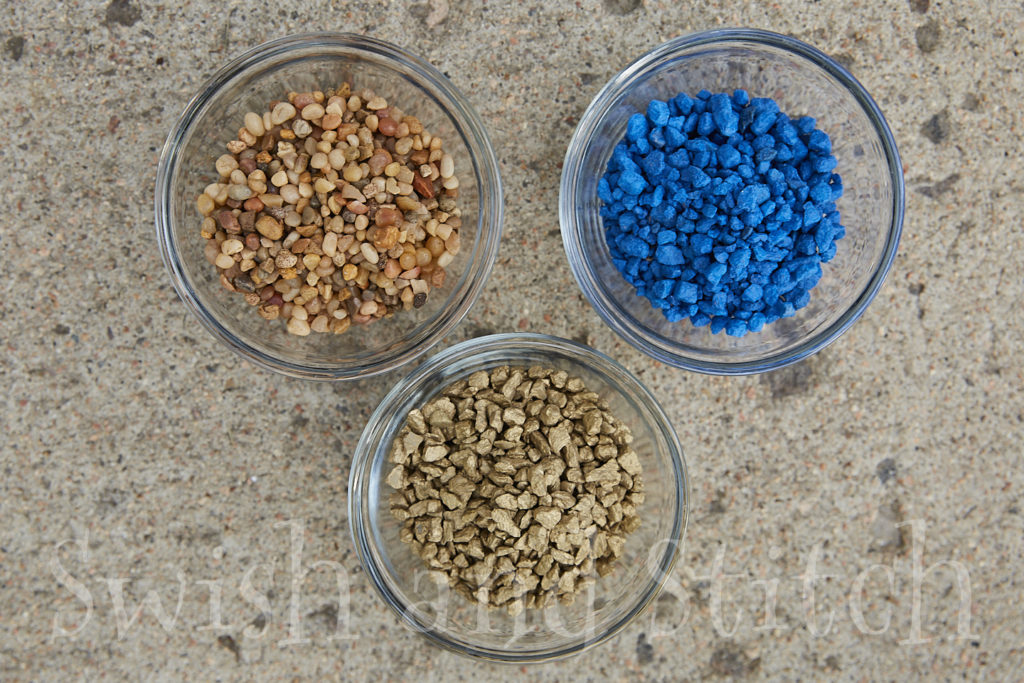
Pet stores also have colorful gravel and rock that can used to create pathways and to simulate water. You will need to find a way to contain the gravel as it may float around or get mixed with soil when you water your pot. Larger pebbles will be less likely to move around.
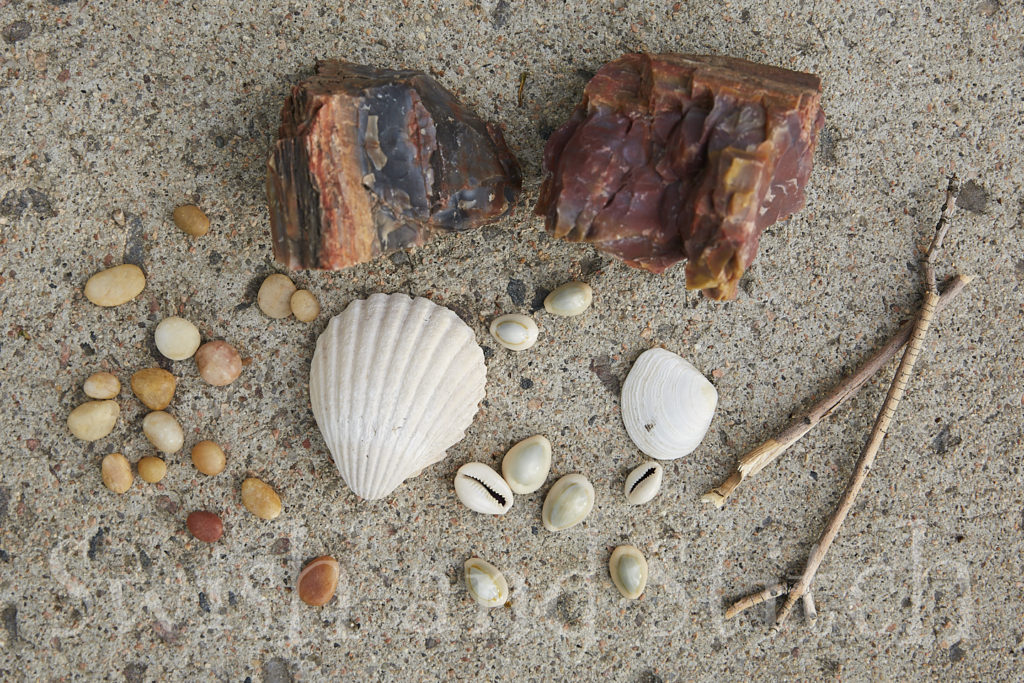
Natural Elements
Don’t forget to look out in nature for possible additions to your garden! Pebbles make wonderful pathways and patios. Seashells can create a beach scene. Agates and petrified or drift wood can be used for mountains or other focal points. And twigs! Twigs can be used to make fences, swings, ladders, and so much more! You will probably have to replace your twig-made elements each year as they will decompose.
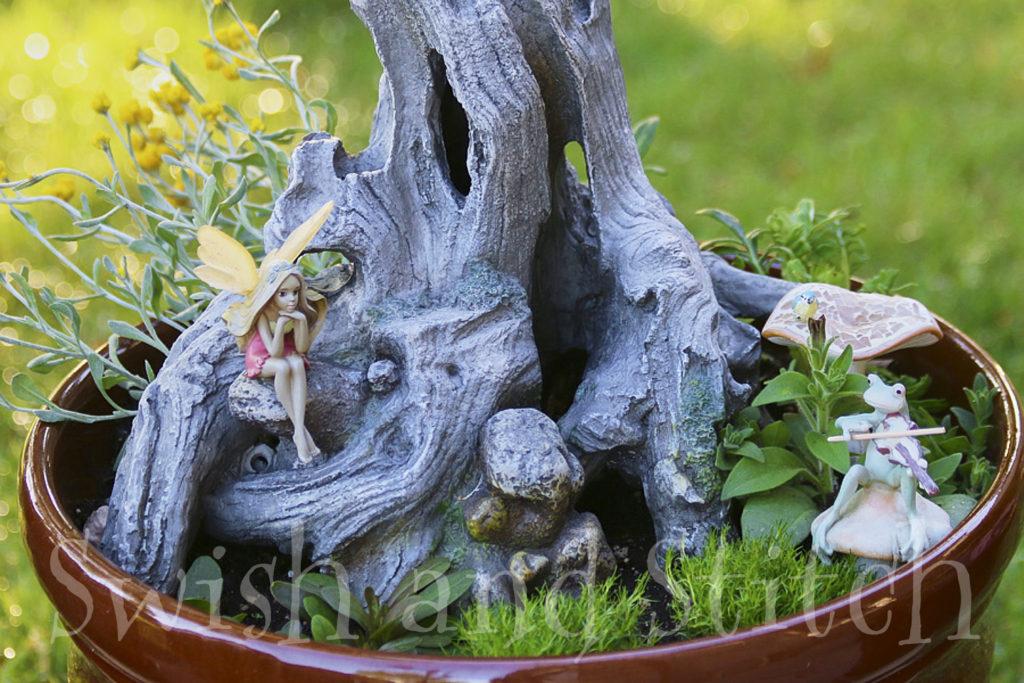
3. Choose your Pot
I like to choose my pot after choosing my largest design element—like a tree, house, cave, or bridge—to make sure I choose a large enough pot. You’ll want a pot that is fairly deep and at least as wide as your largest accessory—usually wider—to allow room for your plants and smaller accessories.
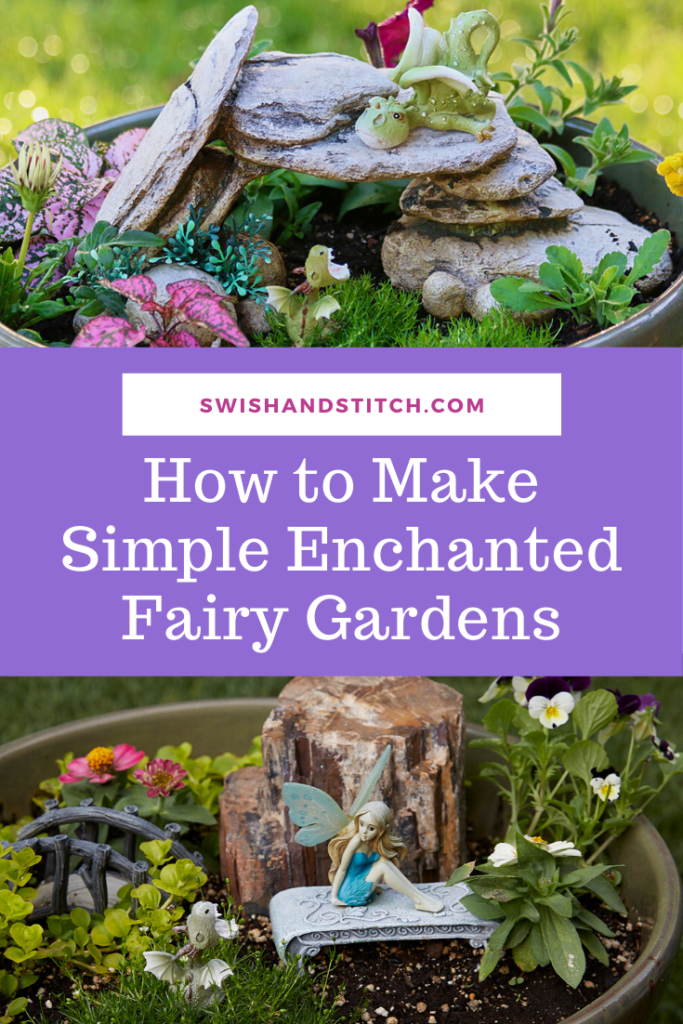
In the photo below, the aquarium decoration “tree” almost fills the pot. It is a perfect perch for the fairy who listens as the frog plays its fiddle.
4. Choose Your Plants
Your fairies live in a tiny world, and the plants you choose should be of a similar scale. Go to your local nursery or garden center and browse. Look for plants that are low- and slow-growing and have small leaves and flowers. You can try small shrubs that can be pruned to keep them small, but to keep things easy, stick with annuals and low ground covers.
Also, choose plants that have similar soil, sun, and watering requirements. I tend to pick annuals that like sun and moist soil. If you like the look of succulents and cacti instead, stick only with succulents and cacti. Don’t mix plants that have different requirements. They won’t be happy together in the same pot.
A few plants that I use regularly are:
- Irish or Scotch Moss – I use Irish Moss a lot as grass in my gardens. It produces tiny white star-shaped flowers in the summer.
- Polka Dot Plant – Polka Dot Plant has fun spotted leaves in white, pink, or red.
- Wave Petunias (look for the smaller-flowered varieties) – These are great for bright color and for trailing over the sides of your pot. And even better, they will flower all season long without needing to be deadheaded.
- Sweet Alyssum – Alyssum is easy to maintain and produces small white, pink, or purple flowers on 3-6-inch stems.
- Creeping Jenny – This is a great trailing plant with bright yellow-green leaves.
- Silver Falls Dichondra – Dichondra is another awesome trailing plant but with silver-green leaves.
- Johnny Jump Ups – Johnny Jump Ups and other smaller flowering pansies are cheerful and deadhead easily.
There are, of course, so many other options. Choose plants that are tested for your region. These will grow better in your particular climate.
You will want enough plants to mostly fill your pot after putting in your large structures and any garden paths or ponds without overfilling it. Remember, your plants will grow! Leave a little space between plants to allow for summer growth.
5. Putting It All Together!
When putting my fairy gardens together, I follow the same simple steps each time.
- Put some large gravel or small landscape rocks in the bottom of your pot. Having rocks in the bottom of your pot will keep the drainage holes from becoming clogged with soil. This helps your pot to drain properly so the soil doesn’t become soggy. Soggy soil will cause the roots of your plants to decay.
- Add your soil. Fill the pot with potting soil up to 2 inches below the top. Only use potting soil. Other soils—topsoils, garden soils, raised bed soils—will be too heavy to do well in pots. One exception! If you have chosen to use succulents or cacti, you will need to use soil specifically formulated for them.
- Water your soil thoroughly. Sometimes dry soil does not absorb water well. When your soil looks wet, stir it up with a trowel, looking for dry spots. Continue to add water to your pot until all the soil is damp but not water-logged.
- Place your largest decoration. This will likely be a tree, house, gazebo, castle, or mountain. Figure out where you want it and place it in the pot.
- Add medium-sized decorations, if any. These might include a bridge, a bench, a rock, a smaller tree, etc. Anything else that you need to plant around goes in now.
- Plant your plants. Begin by placing your plants on top of the soil. Move them around until you are happy with their placement. When you like your plants’ locations, plant them into the soil. Tamp the soil down lightly and water your newly planted plants.
- If using rocks as stepping stones, “water,” pathways, or patios, place them next.
- Decorate your garden! Add your fairies, dragons, wizards, Stormtroopers, or other people and anything else you’ve chosen to embellish your garden.
A word of warning!
Don’t be afraid to NOT use all your accessories!
Let me say it again. You don’t have to use every fairy, animal, rock, or other accessory that you thought you would. Sometimes fairy garden designers go overboard with their decorations. This makes the garden look sloppy or crowded. Stick to a simple scene. Your fairy garden will be more beautiful and, dare I say it, more powerful if you do. Too many decorations leave a viewer confused, not knowing what the focal point should be.
6. Upkeep
Just a couple of quick notes about maintaining your garden. Your gardens won’t need much additional work throughout the season, but they do require a little upkeep.
You will need to water your fairy gardens just like any potted plants you keep outside. The frequency you water will depend on your climate, how quickly your pot dries out, and the type of plants in your pots. In most cases, the soil should be moist, but not soggy. If you have chosen succulents or cacti, you will not need to water very often.
Your plants will grow and need to be trimmed. Don’t hesitate to cut back your plants if they are crowding your fairy and other elements. Most plants cannot be trimmed too much. Plants want to survive and a snip here or there won’t hurt.
You may need to deadhead your flowers from time to time. Deadheading is just trimming off dying flowers. Deadheading promotes additional blooming. If you do not deadhead, your plants may form seeds and stop producing flowers.
Et voilà! Your garden is finished and ready to be oohed and aahed over! Enjoy!
~Lucinda


Pingback: 16 Rustic Gardens Inspired by Pennsylvania’s Countryside
Pingback: 21 Rock Garden Ideas to Inspire Your Outdoor Space - TopReviewsAdviser