Some of the links on this site are affiliate links. I make a small commission from sales when you click through the link. There is no additional cost to you.
This article was originally published on Happily Ever Aperture but has found its new home here.
Harry Potter Halloween
For years, I never really liked Halloween. It’s a kid’s dream holiday, I suppose, getting to dress up and beg neighbors for candy. My attitude started changing after I read the Harry Potter series. I now see Halloween as an excuse to re-read Harry Potter, build Harry Potter Lego sets, and decorate Harry Potter style.
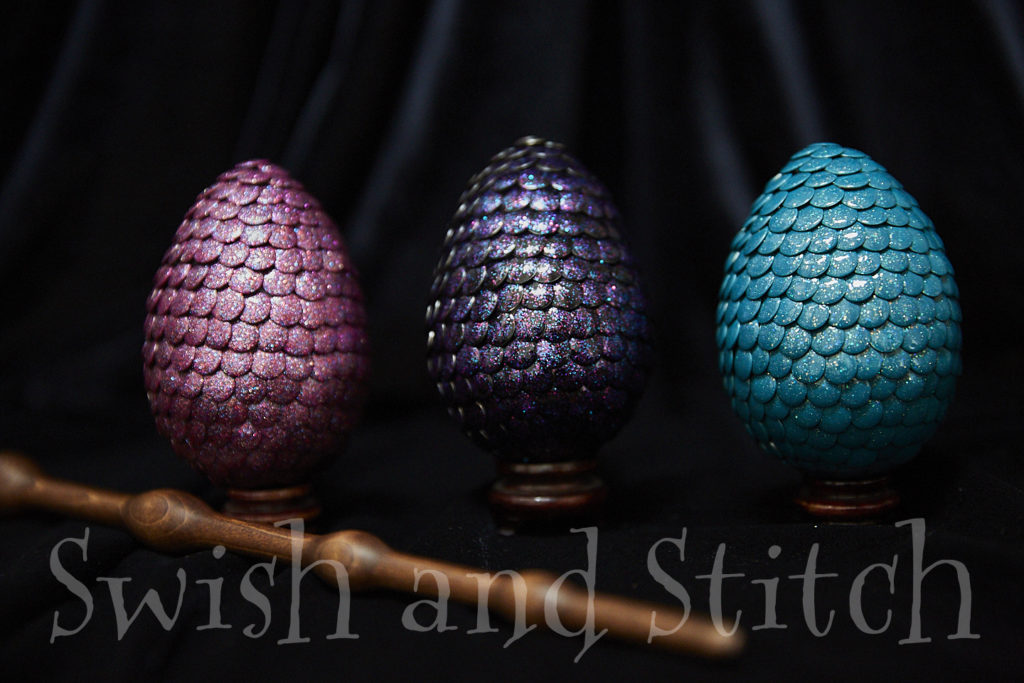
Dragons figure several times in the Harry Potter series. In Harry Potter and the Sorcerer’s Stone, Hagrid, the Hogwarts gamekeeper, wins a dragon egg off a stranger in a pub and hatches the baby dragon, Norbert, in his hut. In Harry Potter and the Goblet of Fire, Harry has to get past a Hungarian Horntail, to collect a golden egg from a nest of the Horntail’s own slate gray eggs. And in Harry Potter and the Deathly Hallows, Harry, Ron, and Hermione release a Gringott’s dragon into the wild after removing Helga Hufflepuff’s cup from the bank vault it was guarding.
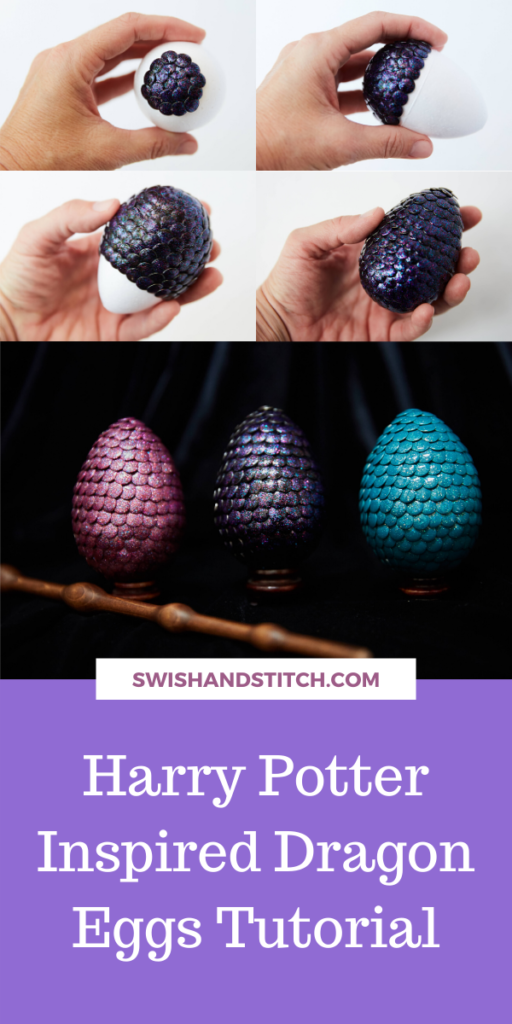
It’s still a few months until Halloween, but if you like to make your own better-than-store-bought decorations, now’s the time to start. So, in honor of Harry Potter’s birthday (July 31st), here’s a simple to make, yet incredible looking dragon egg to get you started.
I found this idea from Accio Lacqer’s turtorial here. For some reason, when I visit her tutorial now, it no longer shows pictures of her finished eggs, which is unfortunate, because they are gorgeous.
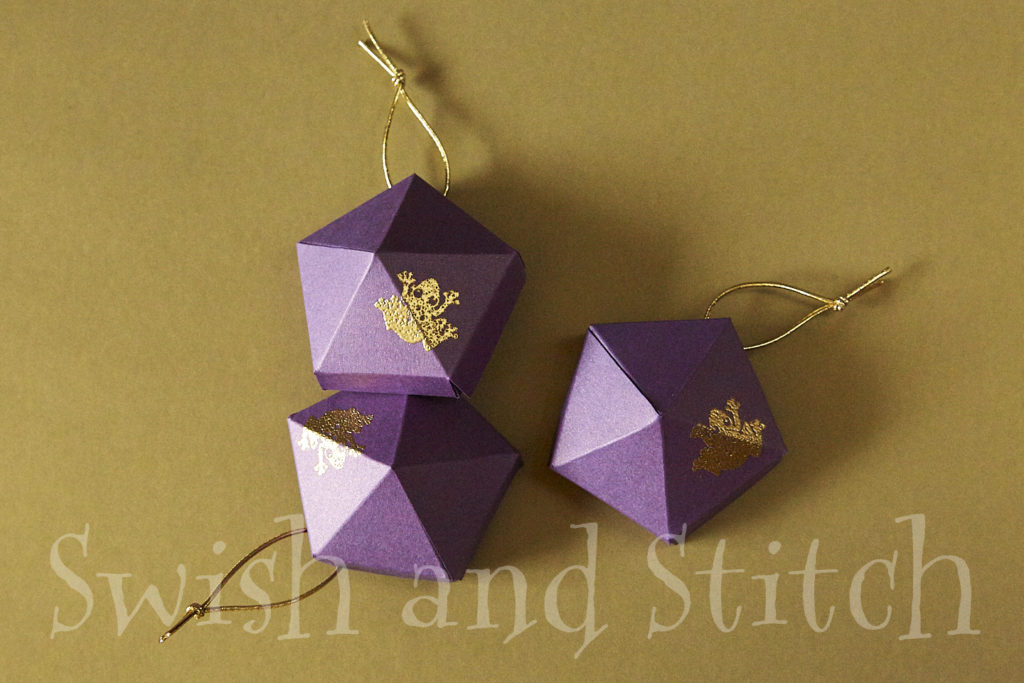
Be sure to look at DIY Harry Potter Inspired Chocolate Frog Boxes! These boxes can be made in two sizes—one to hold chocolate frogs and one to turn into ornaments for a miniature Christmas tree. Made from card stock, cord, and embossing powder, these boxes couldn’t be easier!
Harry Potter Dragon Egg Supplies
To make one egg, you’ll need:
- 3″ foam egg
- 300 thumbtacks
- cardboard box
- nail polish: base color, glitter, clear top coat
- super glue
That’s it!
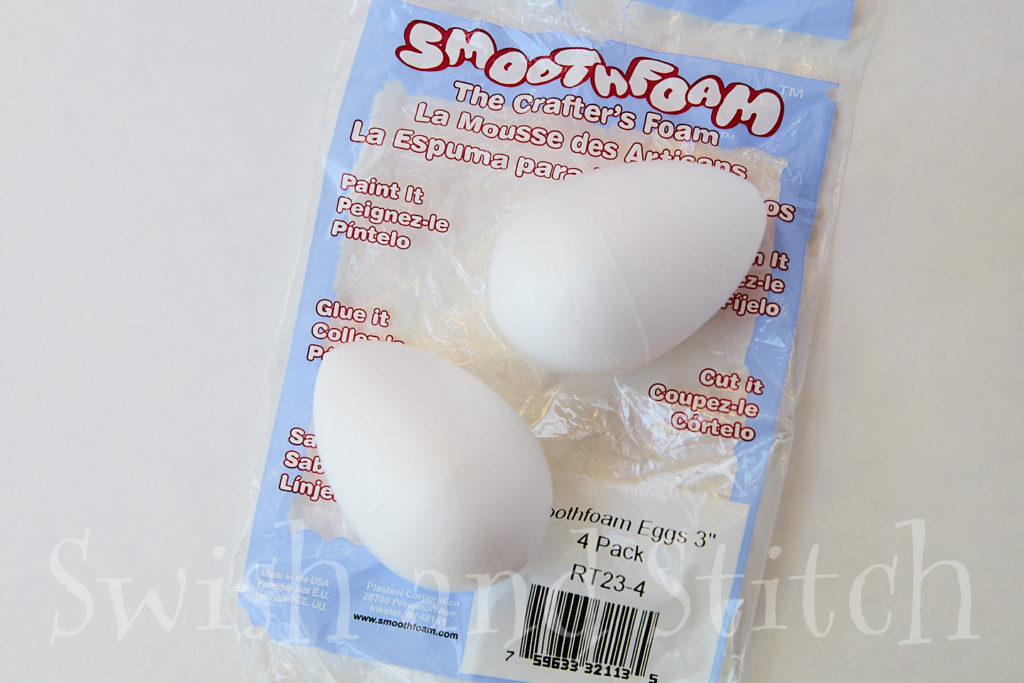
I purchased these eggs Smoothfoam RT23-4 Egg Pastel, 3-Inch, White, 4/Pack through Amazon. I like to work with them better than the regular rough foam eggs. It’s a tactile thing. I like the way they feel better. And, if a tiny bit of foam doesn’t get covered and peeks through, I like the look of the smooth egg better as well.
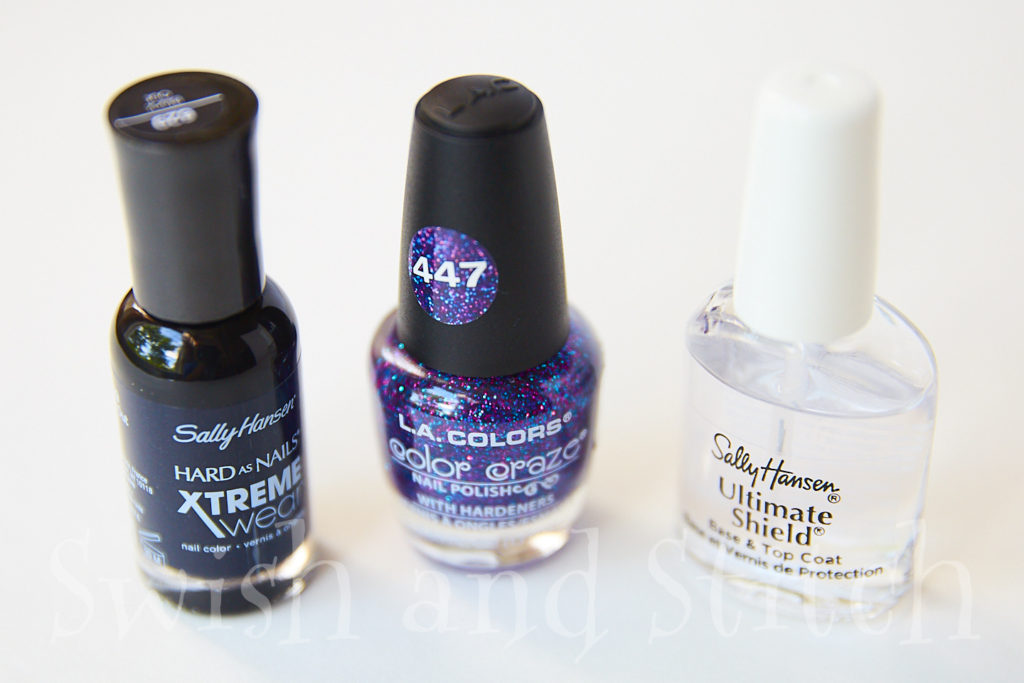
I bought the thumbtacks and glitter polish (L.A. Colors #447) at my local Dollar Tree. I purchased the base color (Sally Hansen Hard as Nails #629 Black Out) and the top coat (Sally Hansen Ultimate Shield) at Target when I saw that the top coat available at Dollar Tree looked very thin. I wanted something thicker that would adequately encase all the glitter flecks from the glitter polish.
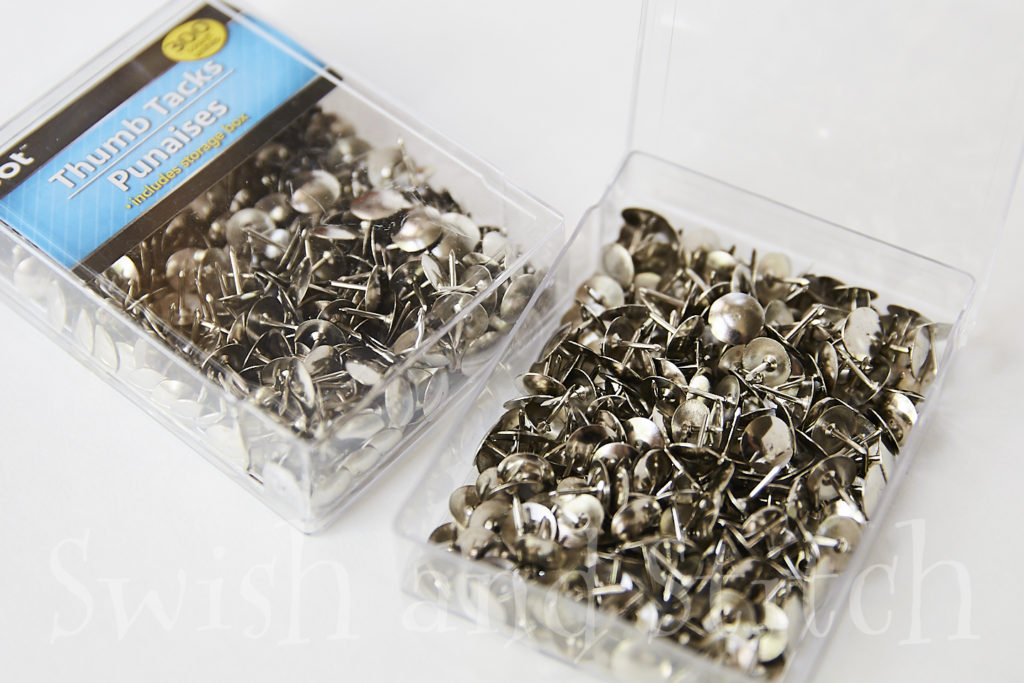
The number of thumbtacks you use will depends on their size and how much you overlap them as you insert them into your egg. As I said above, I bought mine at the Dollar Tree. They were not particularly uniform in size, but this really wasn’t a problem.
Harry Potter Dragon Egg Instructions
Step 1: Tedious Prep Work
To get started, insert the thumbtacks into the cardboard box. Don’t push the tacks all the way in the cardboard. They’re easier to paint if they’re raised slightly and have a little space around them. You don’t want them sticking to the cardboard or each other.
Line them up in neat rows. I put them in rows of ten for easier counting, but, really, just paint all 300 so you have a safety net. Lining them up neatly makes it much easier when painting them to keep track of which tacks have been coated if you choose to do multiple coats of your base color. Obviously, if you only do one coat, it’s easy to tell which ones have been painted, but for a second coat, or when applying the top coat, it’s easier to remember where you are if the tacks are in neat, even rows.
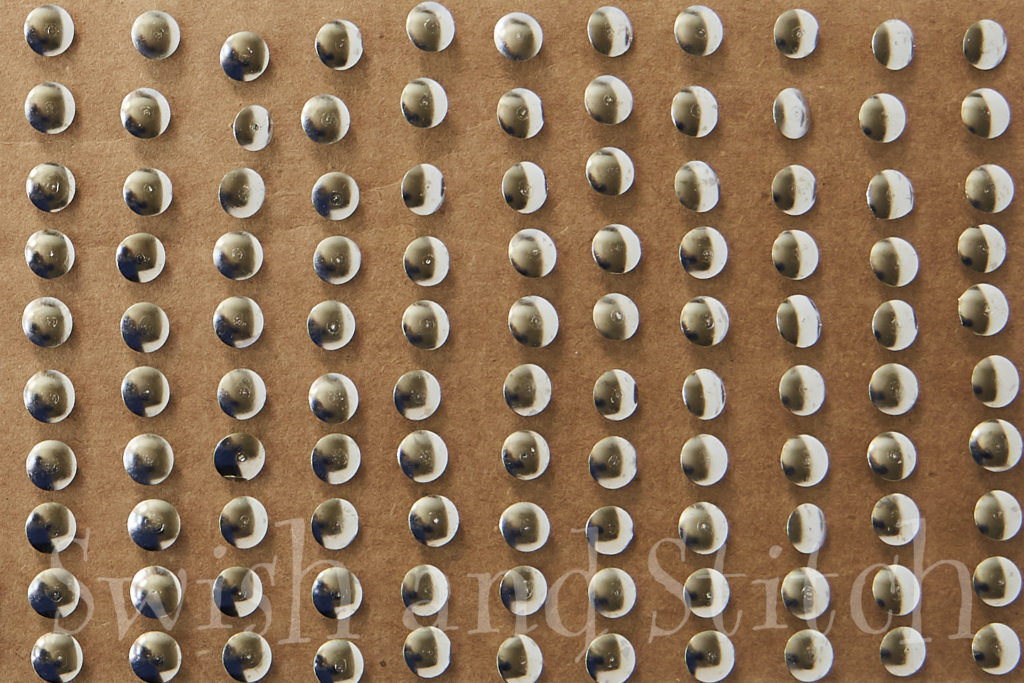
If you get bored easily, play music or watch an old Mission Impossible episode to keep yourself engaged. This step feels super tedious, though it’s not as bad as it seems. It shouldn’t take more than half an hour to get all the tacks lined up and ready to go.
Step 2: Base Color
The fun begins! Paint all of the thumbtacks with the base color of polish. Allow them to dry thoroughly. By the time you’ve finished the base coat, the first ones are probably dry enough to start on the glitter, but I still recommend waiting half an hour or more so you don’t accidentally bump any that are still tacky. Go wash the dishes, call your dad, or start writing an article on how to make dragon eggs. 🙂 There’s always something screaming to be done while you’re waiting.
Now, decide if the base color looks the way you want it to. Depending on your polish, it could look opaque, translucent, streaky, etc. There’s no right or wrong here, it’s all a matter of personal preference whether or not one coat is right for your egg. If it is, move on to step 3; otherwise, add a second layer of base color (and let it dry, of course) before adding the glitter polish.
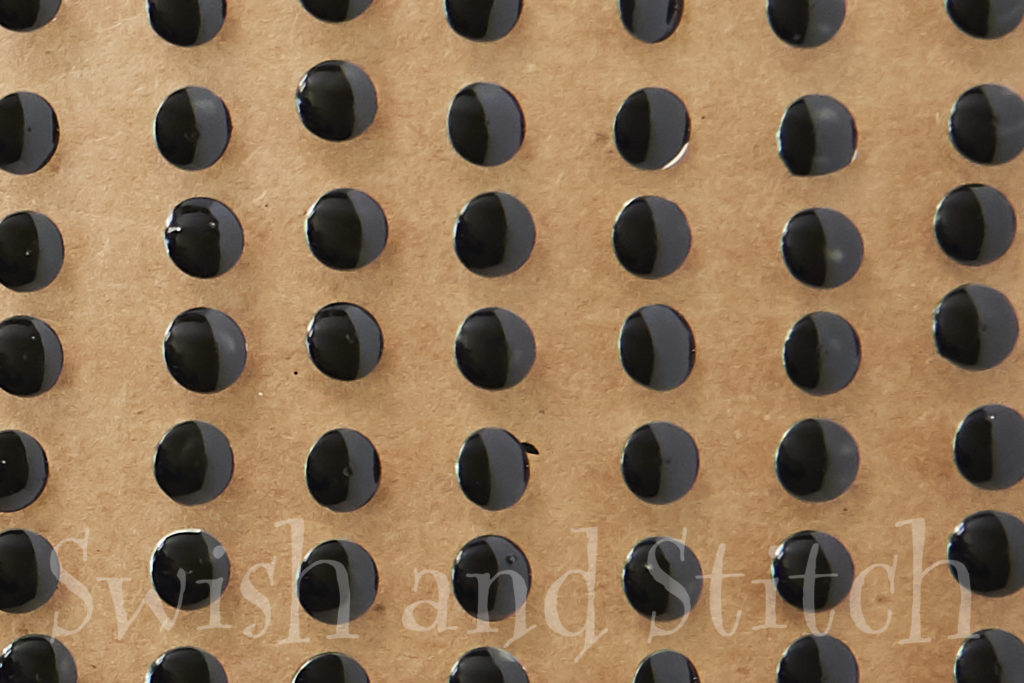
Step 3: Glitter Polish
Once the base color is dry, it’s time to glitter up the thumbtacks. Don’t skimp on the glitter. You won’t really be brushing on the glitter polish, more like gobbing it on. Maybe it’s my cheap $1 polish, but there is a lot of clear polish holding the glitter, so put enough on to ensure a good amount of glitter on each tack.
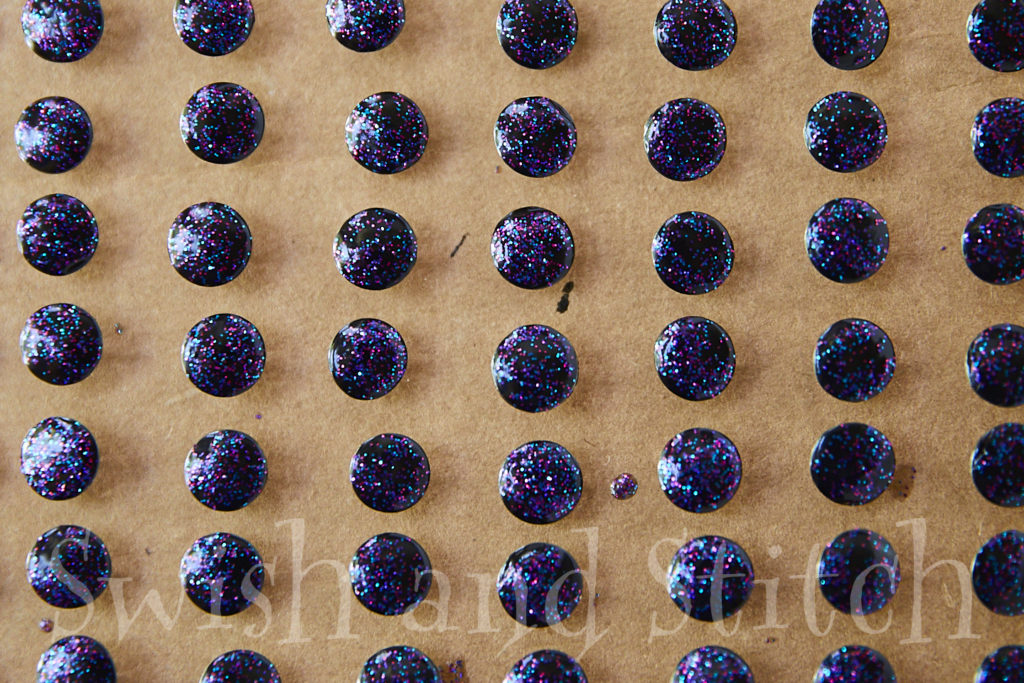
Doesn’t the glitter change everything? Imagine what that’ll look like on the completed egg!
Now sit tight and wait for the glitter polish to dry. If you’ve put on as much as I did, this will take longer than it took for the base color to dry. Give it 30 minutes to an hour before applying the top coat (mow the lawn, bake brownies, or finish your tutorial on dragon eggs).
Step 4: Top Coat
After the glitter polish is dry, add the final coat to the thumbtacks—the clear top coat. The top coat helps even out the uneven surface some glitter polishes can leave—especially if using large-flecked glitter. It also protects the glitter polish, and leaves each tack smooth and shiny.
Again, let it dry. This time, let it cure several hours or overnight. If you’ve ever painted your toenails just before bedtime and woken up with sheet imprints in your polish, you’ll know exactly why. You don’t want to start pushing the tacks into the foam egg and then realize you’re adding fingerprint impressions to each of the tacks. So be patient and let it dry overnight and put the egg together in the morning.
Step 5: Assembling the Egg
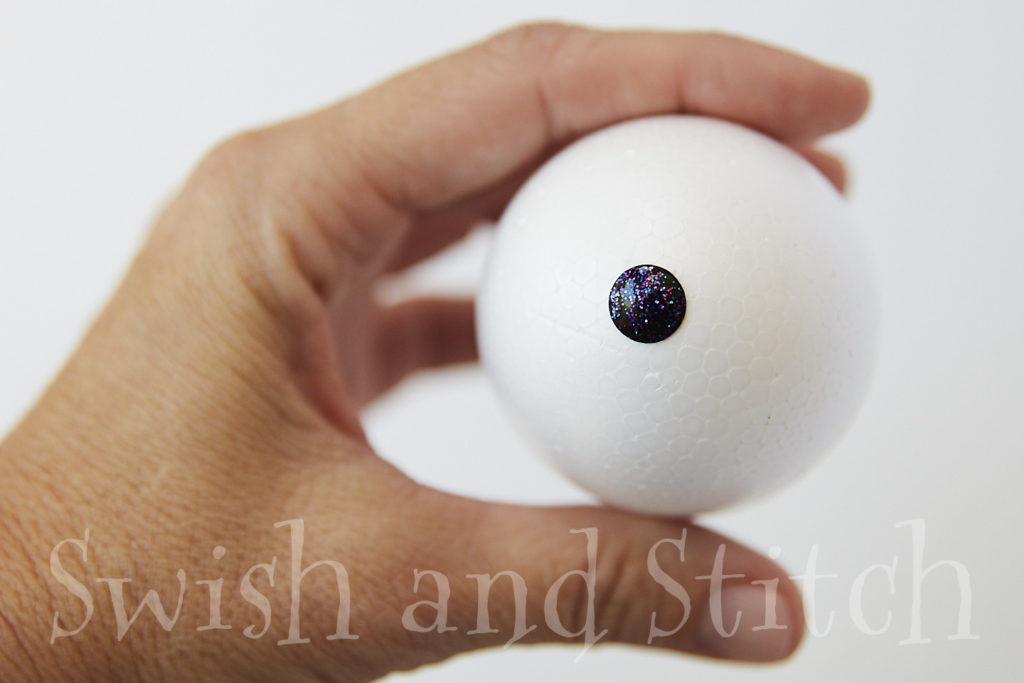
To assemble the egg, turn the egg upside down (fat end up) and insert the first thumbtack right in the center.
Add tacks in a spiral pattern overlapping previous tacks.
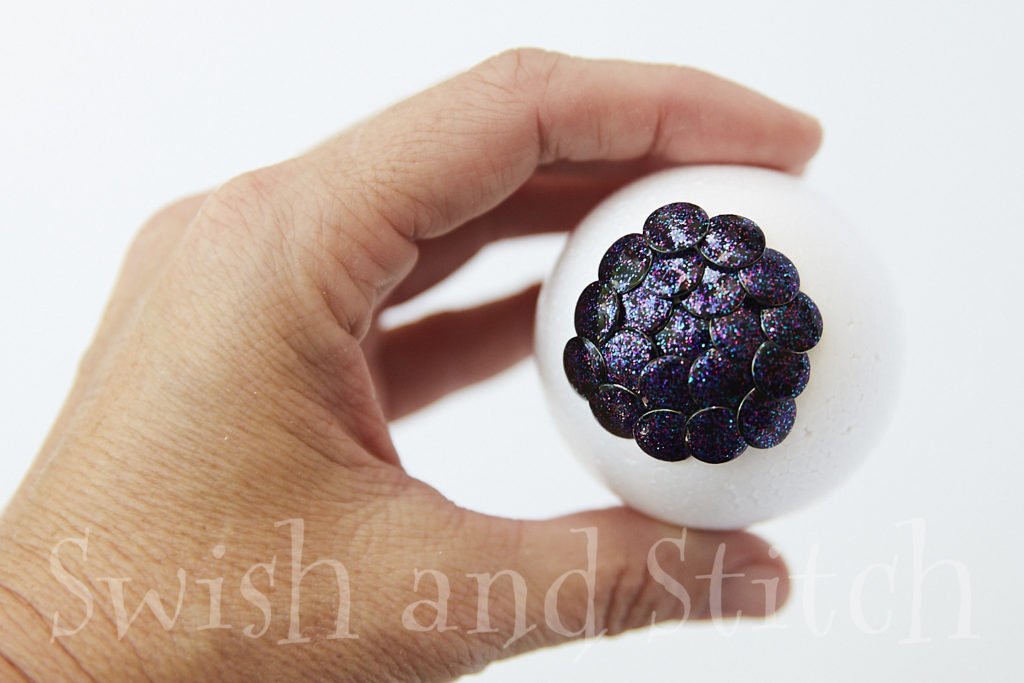
Once you’ve inserted a tack, resist the urge to take it out and move it just a smidge as you could end up creating a double-wide hole that the tack will fall out of. Try and line up each tack—covering white space and overlapping previous tacks—before pressing it into the foam. If a tiny bit of white space shows from time to time, don’t sweat it. Your egg will still look great and no one will ever notice.
This is what my egg looked life after I’d inserted 100 thumbtacks. Kind of like a giant acorn.
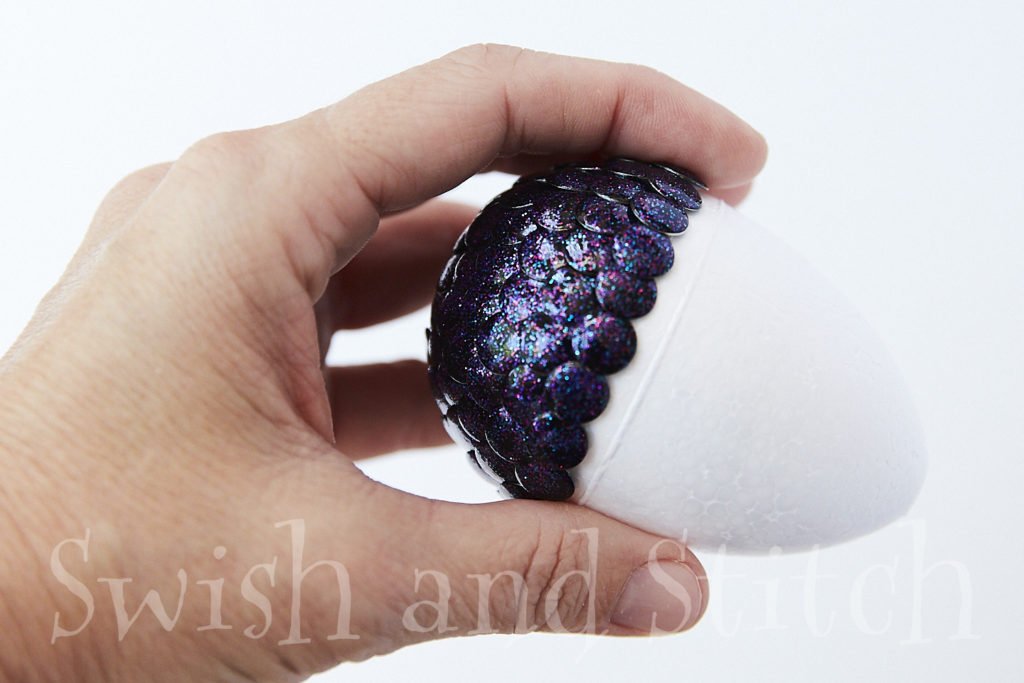
And here it is after 200 tacks. This one reminds me of Toad from Super Mario Brothers.
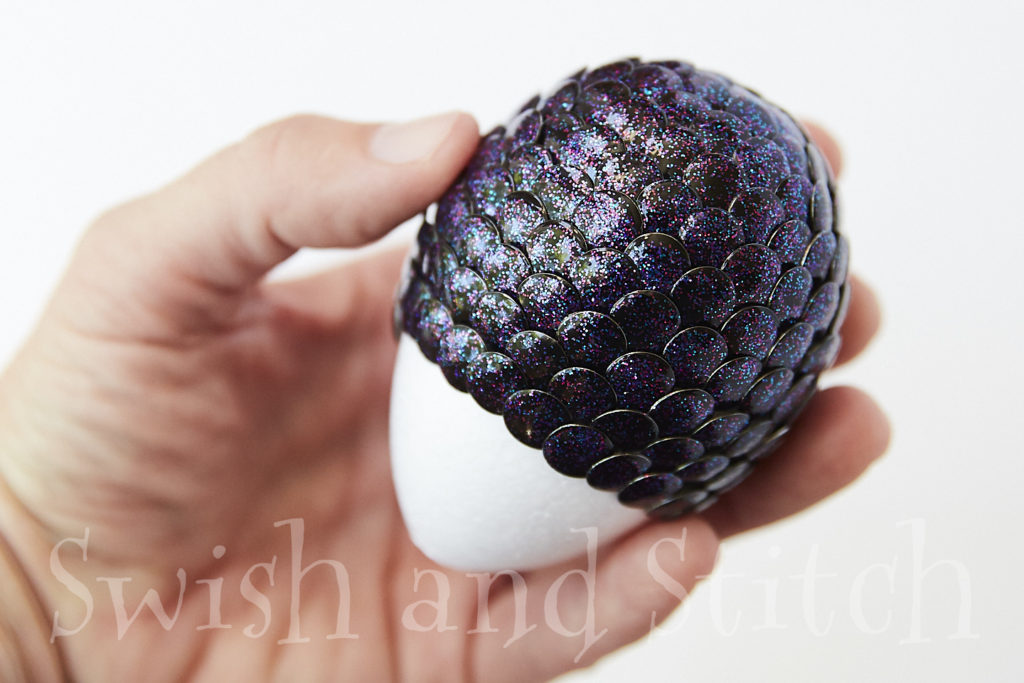
I painted 280 thumbtacks. Two were unusable (one broke when I pulled it from the cardboard, the other had fuzz or something adhere to the surface while drying and wasn’t flat). Of the remaining 278 thumbtacks, I used 278 of them. That was cutting it a little close. Again, save yourself the worry and the headache of needing to paint more and give yourself a safety net by painting all 300 up front.
Before inserting the very last tack at the top of the egg if using smooth foam eggs like mine, place a generous dollop of super glue in the hole at the top. Put a little glue, also, on the underside of the head of the final tack. Press the last tack in and hold for a couple of minutes until the glue starts to set. If using eggs that do not have a hole at the top, add glue to the pin and the underside of the head and insert the final tack.
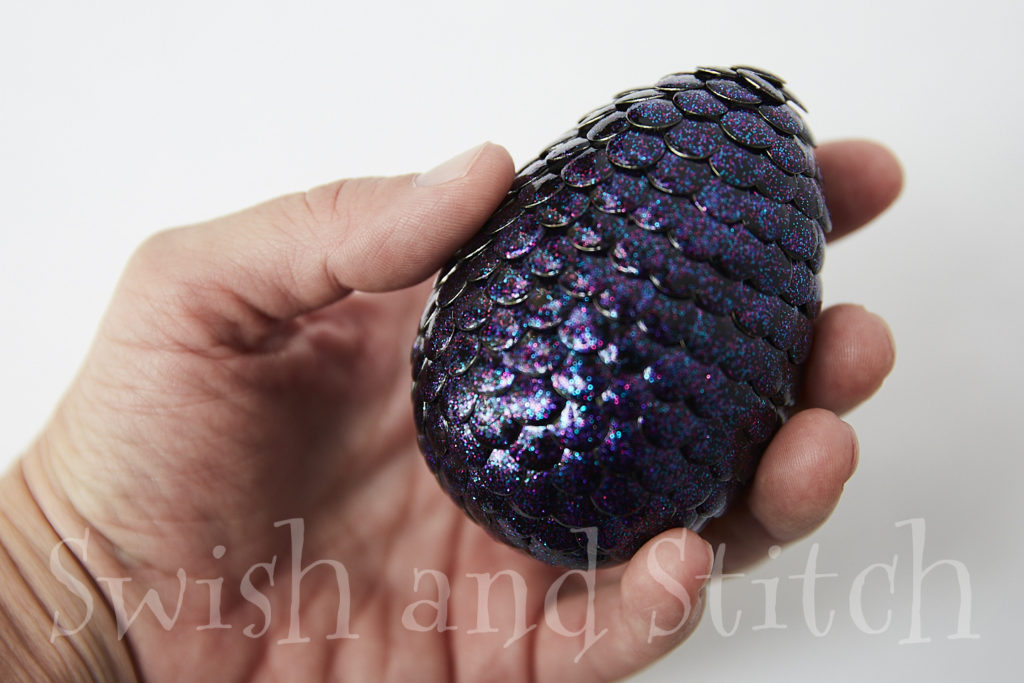
Now step back and admire your handiwork. Doesn’t your Harry Potter Dragon Egg look amazing? Wouldn’t you like to make a whole clutch of these? The color possibilities are endless.
If you give this a try, let me know how it worked for you. What color(s) did you choose? What is your favorite one? I’m planning to make other colors. Maybe red with gold glitter—a Gryffindor egg! Or green with silver for Slytherin.
Cheers!
~Lucinda


If I want to create a 6″ foam egg like this, do I still use the small typical thumb tacks? And does it matter if you get the flat headed tacks or should they be the typical domed ones?
Hi Sarah,
I have never made an egg that large myself, but I did a quick online search and saw that other people have. I use the cheapest thumbtacks I can get—from Dollar Tree. Mine are slightly curved on top. From what I’ve seen in others’ photos, you can still use the standard size tacks. And for an egg that large, you could use flat-headed tacks if you like, though I prefer a slight curve personally. I’m not sure how many thumbtacks you’ll need. For me, I use 200 for a 2.5-inch egg and 300 for a 3-inch egg. Let me know how many you end up using. I’m sure others will have the same question.
Lucinda
I would love to know what you used for the stand in your egg ornament picture. Thanks!
The stands I used in my first photo are from decorative eggs that I was given. They are similar to these stands on Amazon: https://amzn.to/3nDGD0s There are many other options if you want something more decorative. Just type in “decorative egg stand” in the Amazon search to see the possibilities.
would you be able to put the tacks in the egg and THEN paint it?
You certainly could give it a try. I was afraid there could be puddling of the nail polish from a tack to one beneath it and I wanted a very crisp look on the scales. It certainly would be faster! If you try it and it works for you, let us all know.
A great summer time project. Clear instructions and good pictures. We had just the best time making them and plan on a lot more.
All had chosen different colors and until we started putting them together ,we were not sure how the colors would work! Great surprise! Thank you very much!
I’m so glad you enjoyed this project!
You only need to wait two minutes between coats on nail polish!! It allows it to harden enough to stay put but be wet enough to bond with the next coat entirely!! Only wait 45 minutes after the last coat!!!
Good to know!