Ghosts of Hogwarts Afghan—Helena Ravenclaw
Some of the links on this site are affiliate links. I make a small commission from sales when you click through the link. There is no additional cost to you.
“‘When I lived,’ she said stiffly, ‘I was Helena Ravenclaw . . . I stole the diadem from my mother.’
“‘You — you did what?’
“‘I stole the diadem,’ repeated Helena Ravenclaw in a whisper. ‘I sought to make myself cleverer, more important than my mother. I ran away with it.'”
Harry Potter and the Deathly Hallows
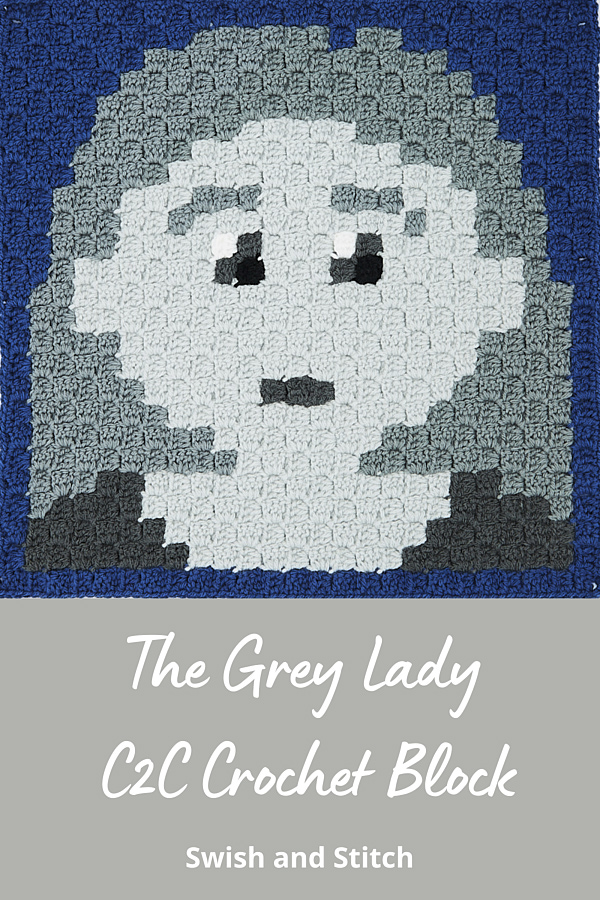
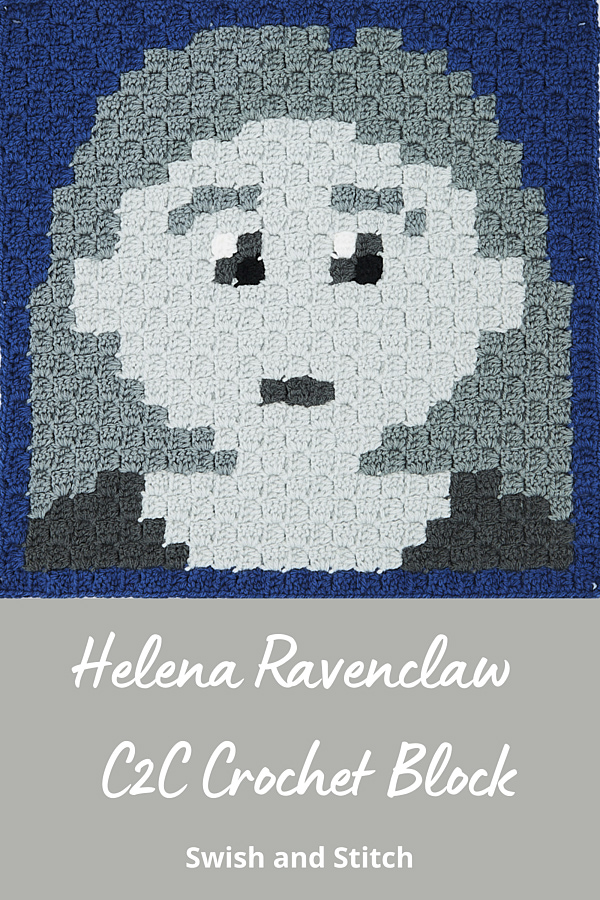
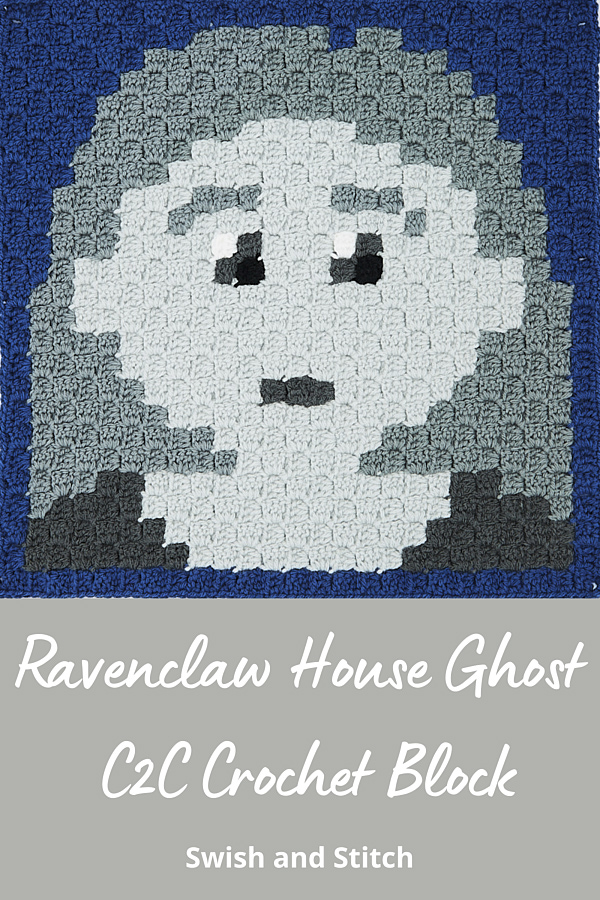
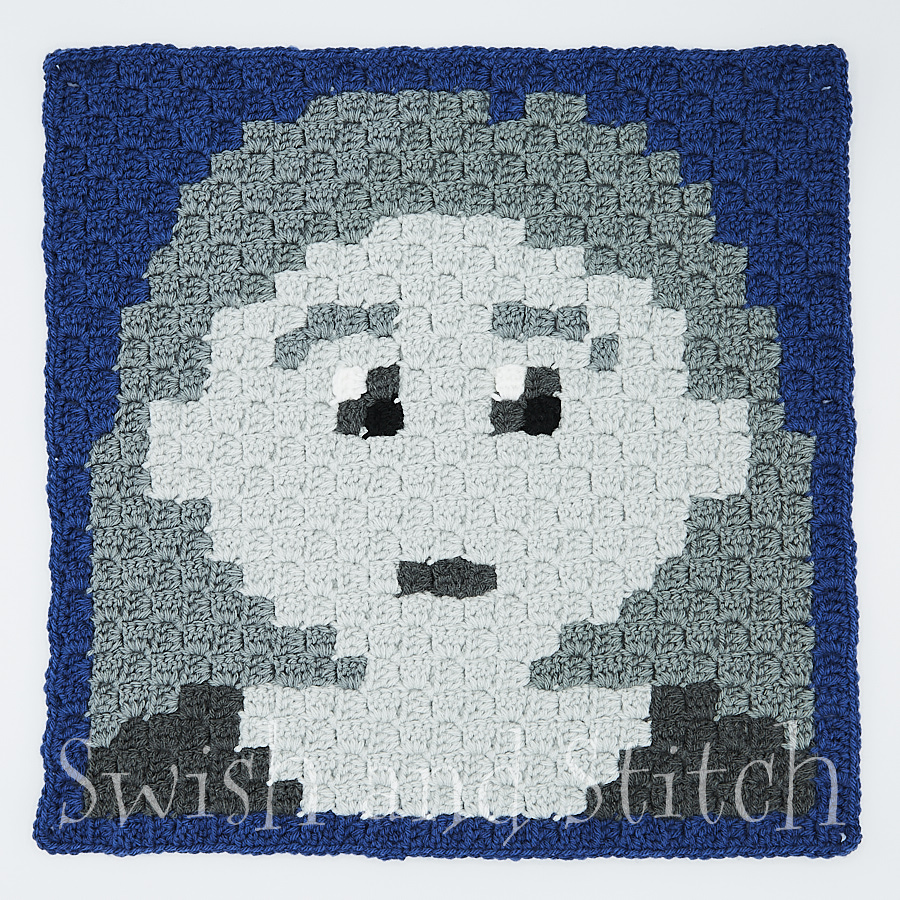
The final block in the Hogwarts House Ghost C2C Crochet Afghan is the Grey Lady (or here in the US, the Gray Lady). We don’t know much about her until the final book in the series Harry Potter and the Deathly Hallows when the Grey Lady’s backstory becomes a relevant piece in the puzzle of defeating Lord Voldemort.
As mentioned in the quotation above, the Grey Lady was Helena Ravenclaw in life. After stealing the diadem, she ran away and hid herself and her mother’s diadem in Albania. When her mother, Rowena Ravenclaw—one of the founders of Hogwarts, was close to death, she wanted to see her daughter one more time despite her daughter’s betrayal. Helena refused to return. The man (see the Bloody Baron) who had been sent to bring her back grew angry at her refusal and stabbed Helena to death. Appalled at the murder, the baron turned his own knife on himself.
The Grey Lady admits to Harry Potter that she had spoken to one other student. That student was Tom Riddle who learned the location of the diadem, retrieved it, and turned it into one of his horcruxes. The Grey Lady’s information was an important key to Harry’s defeat of Voldemort.
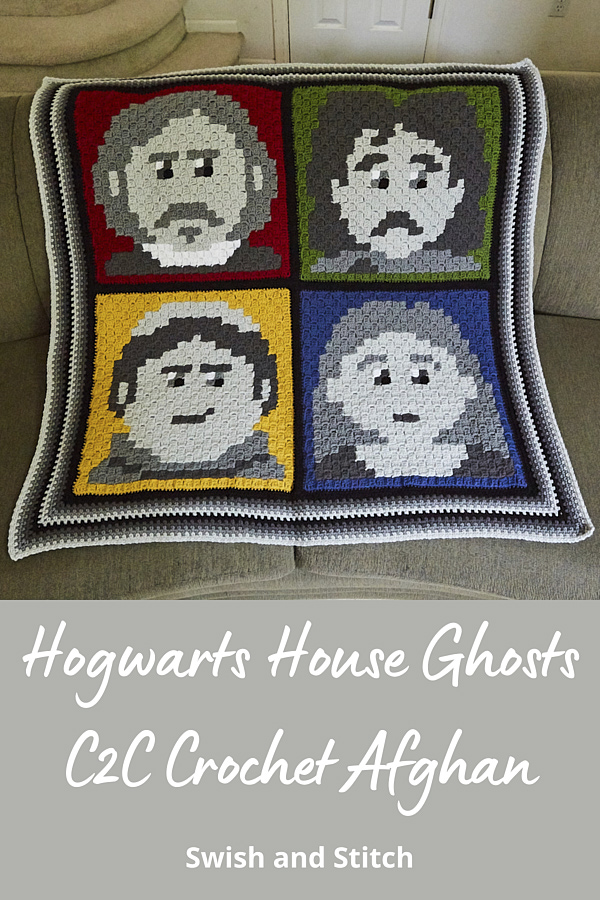
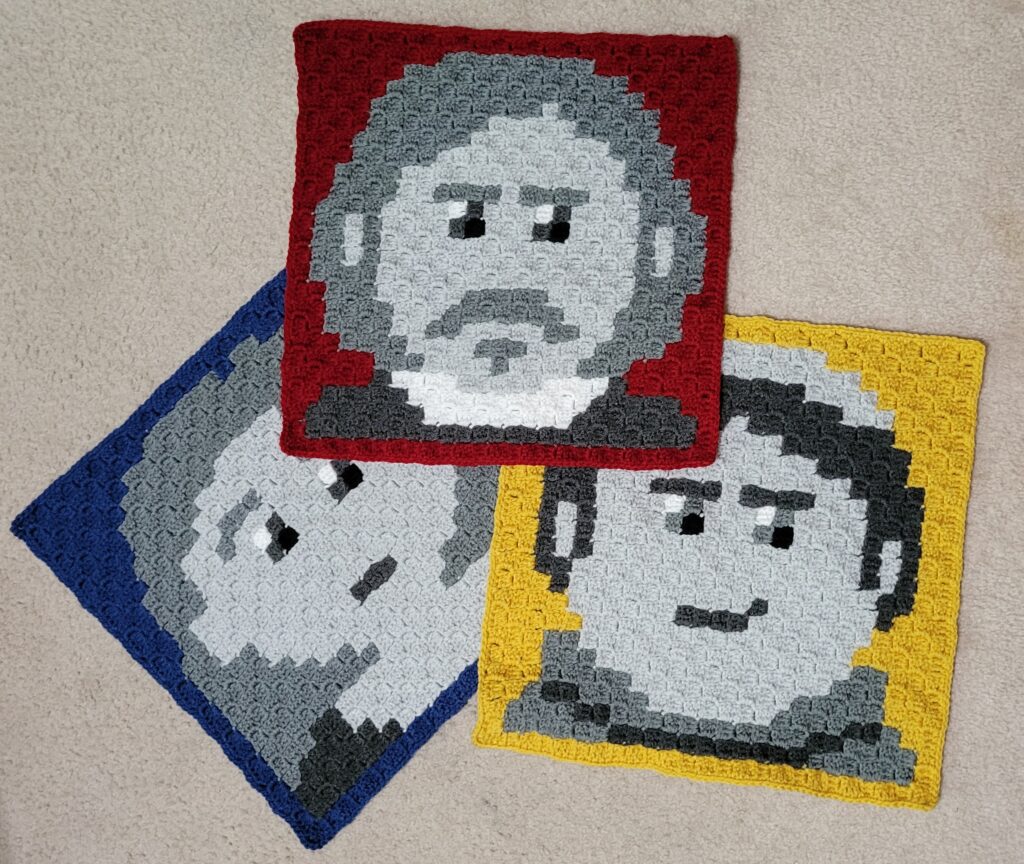
DESIGN NOTE: I’ve chosen to crochet each house ghost in the Hogwarts House Ghosts C2C Crochet Afghan on the primary color of each Hogwarts House. And I’ve chosen to arrange the blocks according to the arrangement of the Houses in the Hogwarts Coat of Arms. Gryffindor—top left. Slytherin—top right. Hufflepuff—bottom left. Ravenclaw—bottom right.
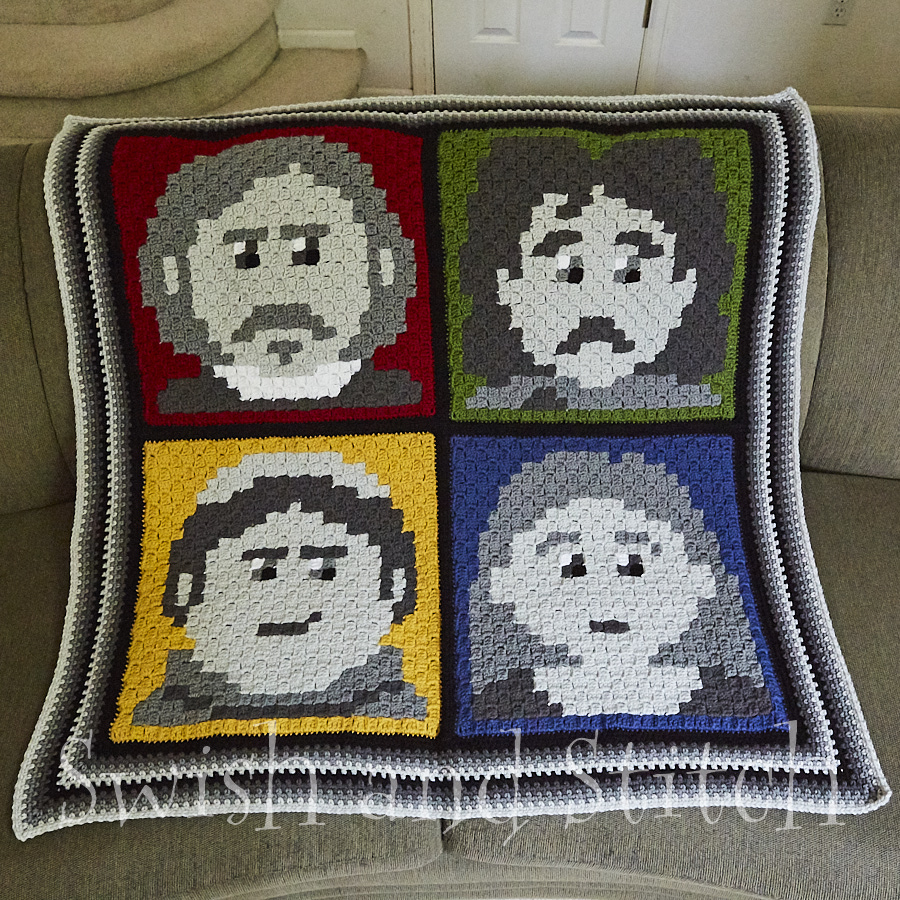
You can find the other Hogwarts House Ghosts Afghan posts here:
- Hogwarts House Ghosts C2C Crochet Afghan Intro
- Nearly Headless Nick (Gryffindor)—AKA Sir Nicholas de Mimsy-Porpington
- The Bloody Baron (Slytherin)
- The Fat Friar (Hufflepuff)
- Hogwarts House Ghosts C2C Crochet Afghan—Joining and Edging
The Grey Lady C2C Crochet Block
Materials
~ The Grey Lady 25×25 Pixel Graph
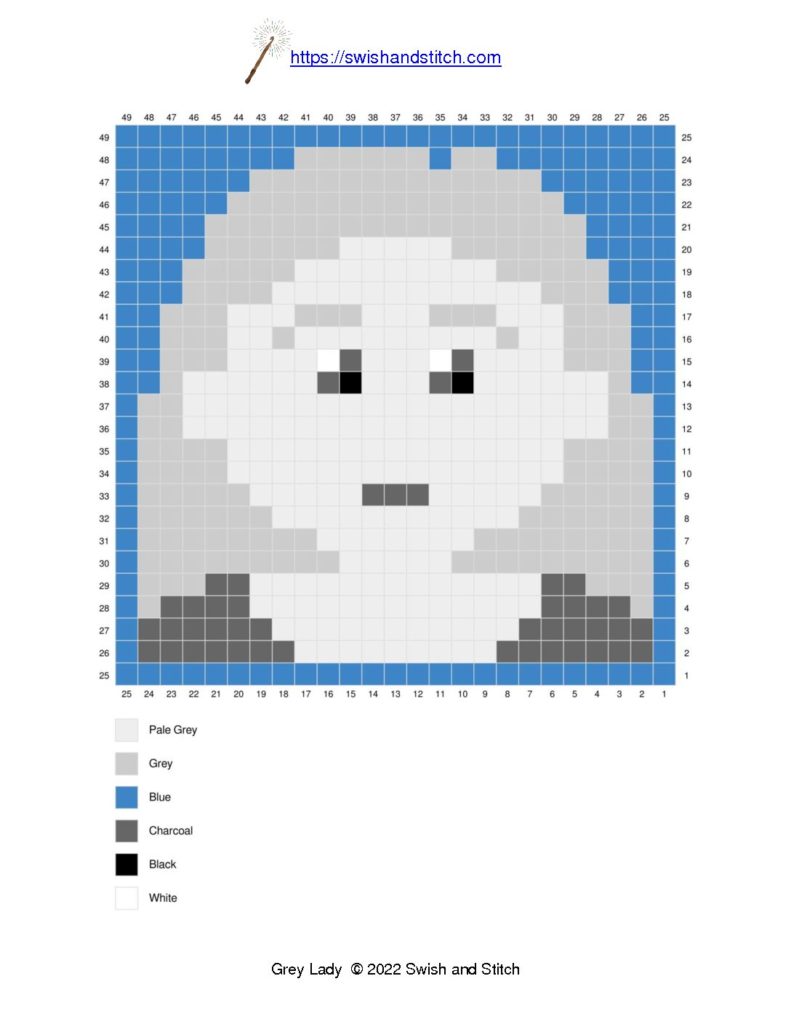
~ Lion Brand Vanna’s Choice Yarn 3.5 oz skeins in the following colors (amounts are approximations):
- Colonial Blue — 2.0 ounces
- Charcoal Grey — .5 ounce
- Silver Grey — 1.9 ounces
- Pale Grey — 2.5 ounces
- Black — .1 ounce
- White — .1 ounce
~ Size H Crochet Hook or hook needed to achieve gauge (see Gauge for C2C Afghans)
~ Yarn Needle
Crochet the square starting from the bottom right corner of the chart. Row-by-row written instructions are below.
After you finish crocheting the block, crochet one row of single crochet in COLONIAL BLUE around the entire block. See Adding a Single Crochet Edge around a Finished C2C Block for how I crochet around the edge.
Next week I’ll post the Joining and Edging instructions. If you haven’t finished the four House Ghost blocks yet, get them done soon, so you can have this fabulously fun blanket done for Halloween.
~Lucinda
Looking for Festive, One-of-a-Kind patterns like the Gingerbread Cookie Lane Afghan? Find it and other delightful Christmas afghan patterns at Swish and Stitch Crafts on Etsy.
Row-by-Row Instructions The Grey Lady C2C Crochet Block
[RS] = Right Side
[WS] = Wrong Side
PG: Pale Grey [221 pixels]
GR: Grey [198]
B: Blue [157]
CH: Charcoal [45]
BL: Black [2]
W: White [2]
Crochet from bottom right corner.
→ Row 1 [WS]: B1 (1 square)
← Row 2 [RS]: B2 (2 squares)
→ Row 3 [WS]: B1, CH1, B1 (3 squares)
← Row 4 [RS]: B1, CH2, B1 (4 squares)
→ Row 5 [WS]: B1, CH2, GR1, B1 (5 squares)
← Row 6 [RS]: B1, GR1, CH3, B1 (6 squares)
→ Row 7 [WS]: B1, CH3, GR2, B1 (7 squares)
← Row 8 [RS]: B1, GR3, CH3, B1 (8 squares)
→ Row 9 [WS]: B1, CH4, GR3, B1 (9 squares)
← Row 10 [RS]: B1, GR4, CH1, PG3, B1 (10 squares)
→ Row 11 [WS]: B1, PG4, GR5, B1 (11 squares)
← Row 12 [RS]: B1, GR6, PG4, B1 (12 squares)
→ Row 13 [WS]: B1, PG4, GR7, B1 (13 squares)
← Row 14 [RS]: B1, GR8, PG4, B1 (14 squares)
→ Row 15 [WS]: B1, PG4, GR2, PG3, GR1, PG1, GR1, B2 (15 squares)
← Row 16 [RS]: B2, GR1, PG12, B1 (16 squares)
→ Row 17 [WS]: B1, PG13, GR1, B2 (17 squares)
← Row 18 [RS]: B2, GR2, PG13, B1 (18 squares)
→ Row 19 [WS]: B1, CH1, PG12, GR3, B2 (19 squares)
← Row 20 [RS]: B3, GR2, PG6, CH1, PG6, CH1, B1 (20 squares)
→ Row 21 [WS]: B1, CH2, PG2, GR1, PG2, CH1, PG7, GR2, B3 (21 squares)
← Row 22 [RS]: B3, GR2, PG8, CH1, PG2, GR1, PG2, CH2, B1 (22 squares)
→ Row 23 [WS]: B1, CH3, PG1, GR2, PG6, BL1, PG1, GR1, PG1, GR2, B4 (23 squares)
← Row 24 [RS]: B4, GR2, PG3, CH2, PG6, GR2, CH4, B1 (24 squares)
→ Row 25 [WS]: B1, CH4, GR2, PG7, W1, PG1, GR1, PG1, GR3, B4 (25 squares)
Corner
← Row 26 [RS]: B4, GR3, PG1, GR1, PG8, GR4, CH2, B1 (24 squares)
→ Row 27 [WS]: B1, GR5, PG8, GR1, PG2, GR3, B3 (23 squares)
← Row 28 [RS]: B3, GR3, PG5, BL1, PG4, GR5, B1 (22 squares)
→ Row 29 [WS]: B1, GR4, PG4, CH2, PG4, GR4, B2 (21 squares)
← Row 30 [RS]: B2, GR3, PG5, W1, PG4, GR4, B1 (20 squares)
→ Row 31 [WS]: B1, GR4, PG5, GR1, PG3, GR3, B2 (19 squares)
← Row 32 [RS]: B1, GR4, PG3, GR1, PG5, GR3, B1 (18 squares)
→ Row 33 [WS]: B1, GR2, PG4, GR2, PG3, GR4, B1 (17 squares)
← Row 34 [RS]: B2, GR3, PG8, GR2, B1 (16 squares)
→ Row 35 [WS]: B1, GR2, PG1, GR1, PG4, GR5, B1 (15 squares)
← Row 36 [RS]: B1, GR7, PG1, GR4, B1 (14 squares)
→ Row 37 [WS]: B2, GR10, B1 (13 squares)
← Row 38 [RS]: B1, GR9, B2 (12 squares)
→ Row 39 [WS]: B2, GR8, B1 (11 squares)
← Row 40 [RS]: B1, GR6, B3 (10 squares)
→ Row 41 [WS]: B4, GR3, B2 (9 squares)
← Row 42 [RS]: B8 (8 squares)
→ Row 43 [WS]: B7 (7 squares)
← Row 44 [RS]: B6 (6 squares)
→ Row 45 [WS]: B5 (5 squares)
← Row 46 [RS]: B4 (4 squares)
→ Row 47 [WS]: B3 (3 squares)
← Row 48 [RS]: B2 (2 squares)
→ Row 49 [WS]: B1 (1 square)