Some of the links on this site are affiliate links. I make a small commission from sales when you click through the link. There is no additional cost to you.
“The dungeon was, most unusually, already full of vapors and odd smells. Harry, Ron, and Hermione sniffed interestedly as they passed large, bubbling cauldrons . . .
” . . . ‘Sir, you haven’t told us what’s in this one,’ said Ernie Macmillan, pointing at a small black cauldron standing on Slughorn’s desk. The potion within was splashing about merrily; it was the color of molten gold, and large drops were leaping like goldfish above the surface, though not a particle had spilled.”
Harry Potter and the Half-Blood Prince
You cannot get through Hogwarts without passing potions. And little as he liked it, Harry can’t even get away from it after passing his O. W. L. S. To become an auror he has to continue with advanced potions. At least he gets a different teacher!
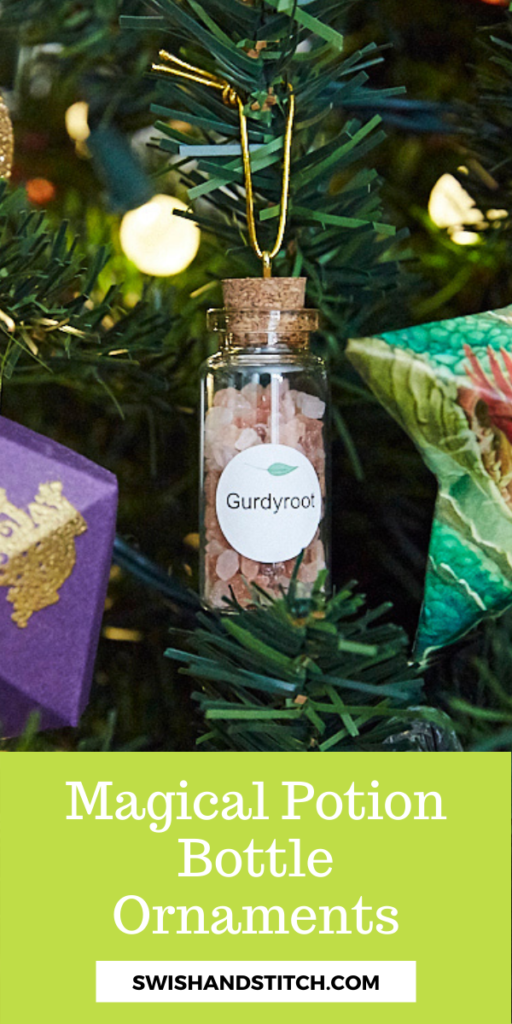
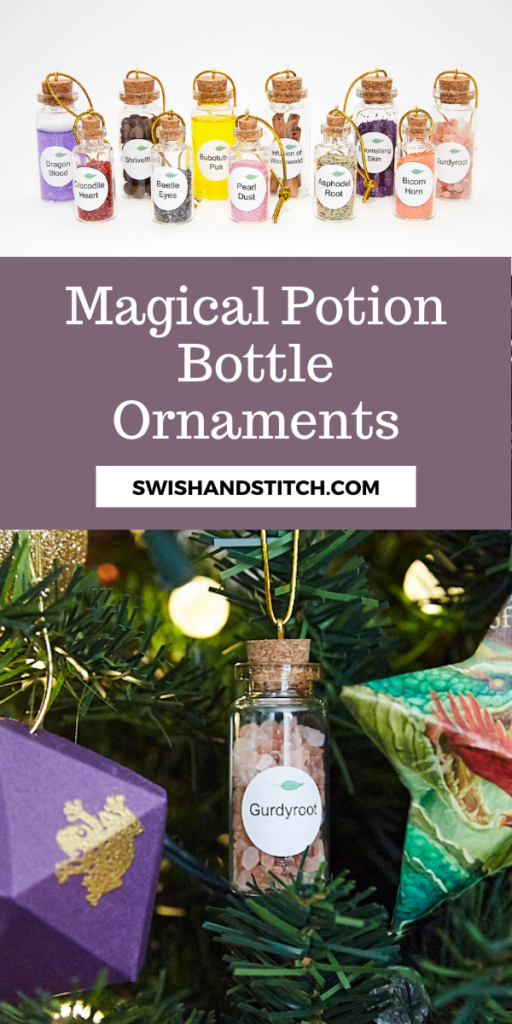
Today I’m showing you all the ins and outs of creating great potion ingredients ornaments to go on your Harry Potter Christmas tree. I’ll show you lots of ideas of how to fill them and I’ll even show you what not to do.
Check out all the ornaments in the Harry Potter Mini Christmas Tree Ornaments Marathon!

Harry Potter Potion Ingredients Ornaments Supplies
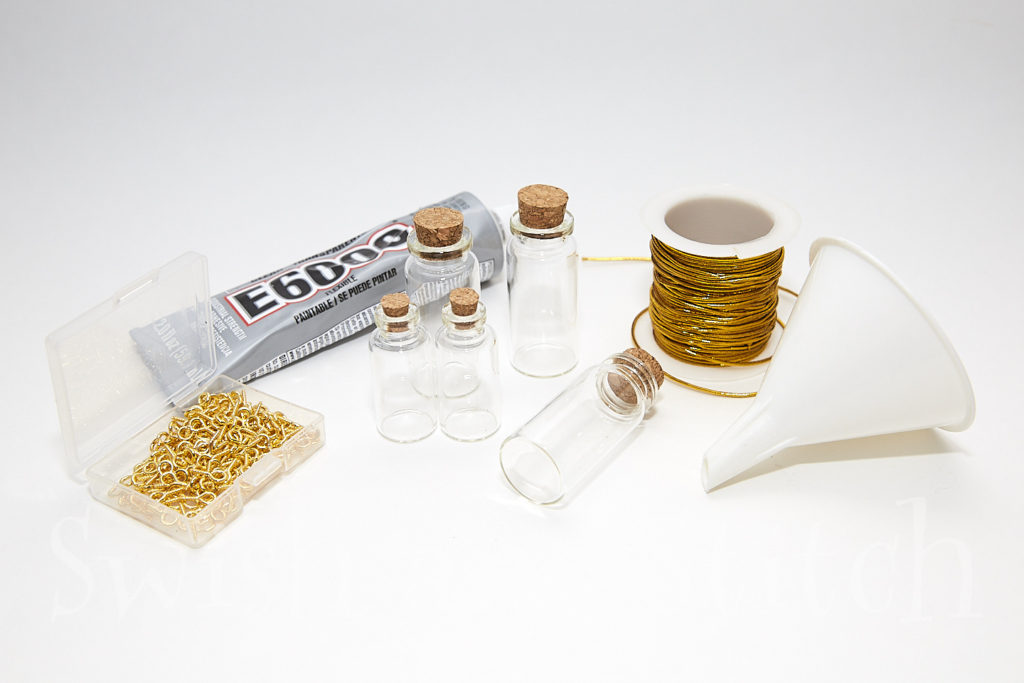
Just a few basic supplies will get you started making potion ingredients ornaments.
Basic Supplies
- 10ml Cork Stopper Glass Bottles
- Small Glass Mini Bottles of 1.5″ length (optional)
- 10 X 5 mm gold screw eye pins
- 1 mm Metallic Elastic Gold Cord
- E6000 Permanent Craft Adhesive, 2.0 oz.
- Small funnel
Filler Ideas
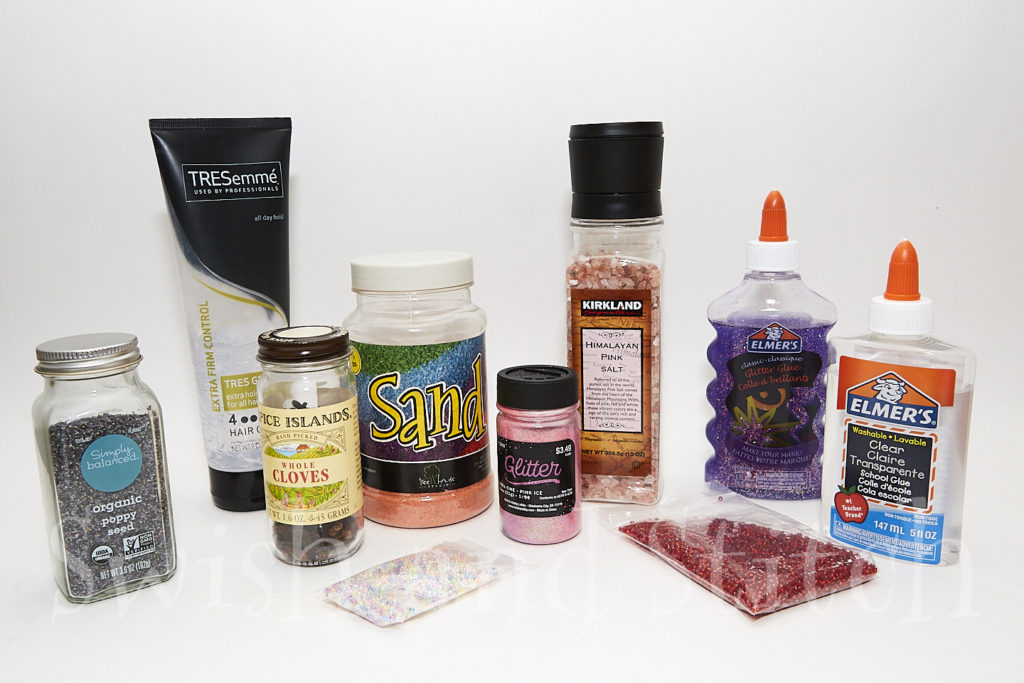
In addition to the basic supplies you will need fillers. Let, loose! Have fun coming up with ideas. I raided my spice cabinet, my bead organizers, and my craft bins. This is what I chose.
- Colored sand
- Glitter
- Spices and herbs
- Seed beads
- Elmer’s Clear Washable School Glue
- Food coloring (to tint the clear glue)
- Glitter glue
- Clear hair gel
Dry Potion Ingredient Bottle Ornaments
As you might guess, these are the easiest to fill. Just choose your ingredient and fill! If you have a tiny funnel, it makes quick work of filling the bottles. If you don’t have a funnel small enough, use a small piece of paper to create your own funnel. Then, either pour or spoon your ingredients into the funnel and gently shake them down into the bottle.
Some fillers are too large for a tiny funnel (allspice, large flake sea salt, larger beads). Just pour a little into your hand and scoop them up with the bottle.
Colored Sand
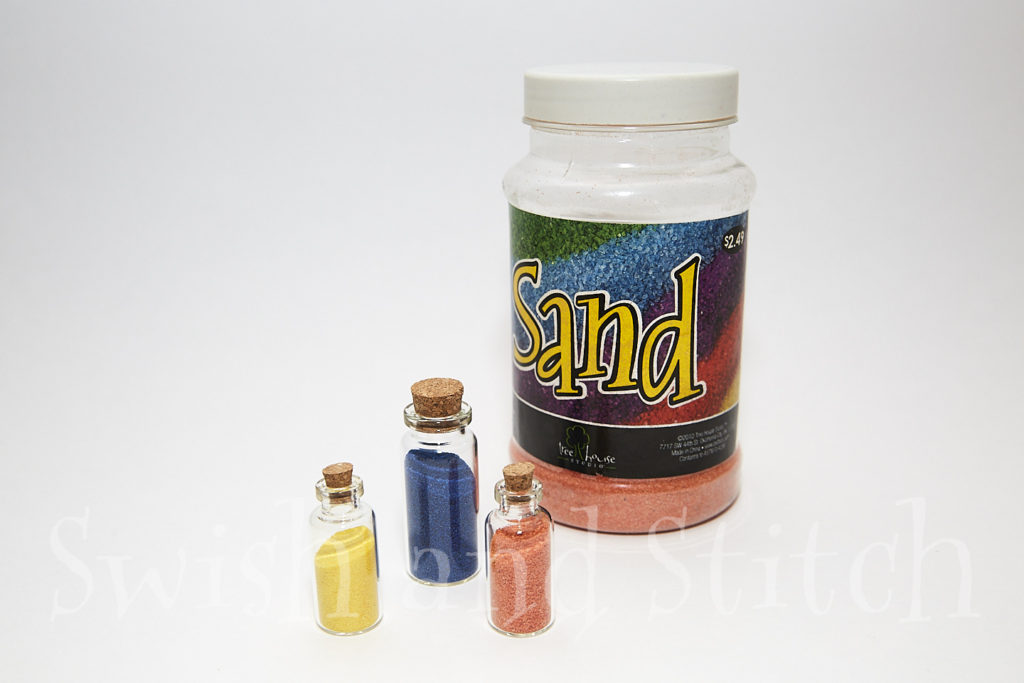
Colored sand is a great inexpensive choice if you want bright colors. You can find multipacks of sand on Amazon, or hit your local Hobby Lobby to purchase individual bottles. As of this writing, a 1.5 pound bottle of sand is just $3. You can fill a lot of bottles with 1.5 pounds! Just be aware that many of the multipacks offered on Amazon do not come in bottles, they come in bags. Even sometimes when the picture shows bottles. So, be sure to read the fine print!
Glitter

If you want something more sparkly than sand, go for glitter. Glitter comes in more colors than the sand and offers a magical touch—especially when Christmas lights reflect off of it. Glitter is a little pricier than sand, but you can frequently find bulk options.
I prefer to use the ultra fine glitter, but regular glitter works like a charm as well.
Herbs and Spices
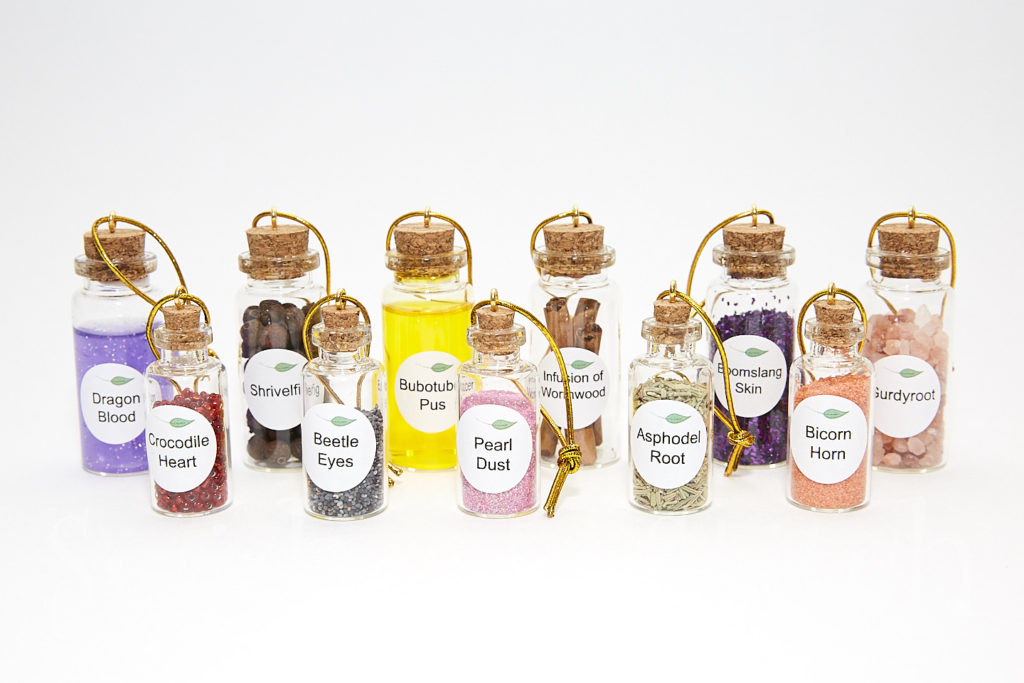
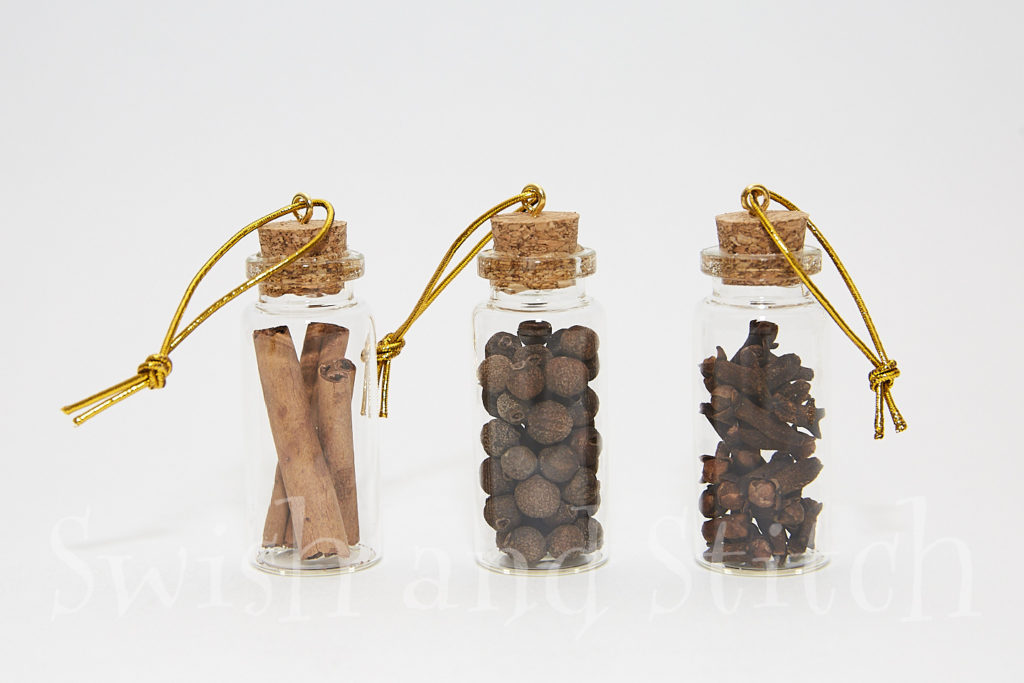
These are my favorites! Using herbs and spices is fun because there are so many different textures. And, to be sure, they look the most natural—kind of like what I imagine potion ingredients really would be. If you’re using both sizes of glass bottles, obviously reserve the finely textured ingredients for the smaller bottles and use the larger bottles for whole cloves, all spice, stick cinnamon, and other larger ingredients.
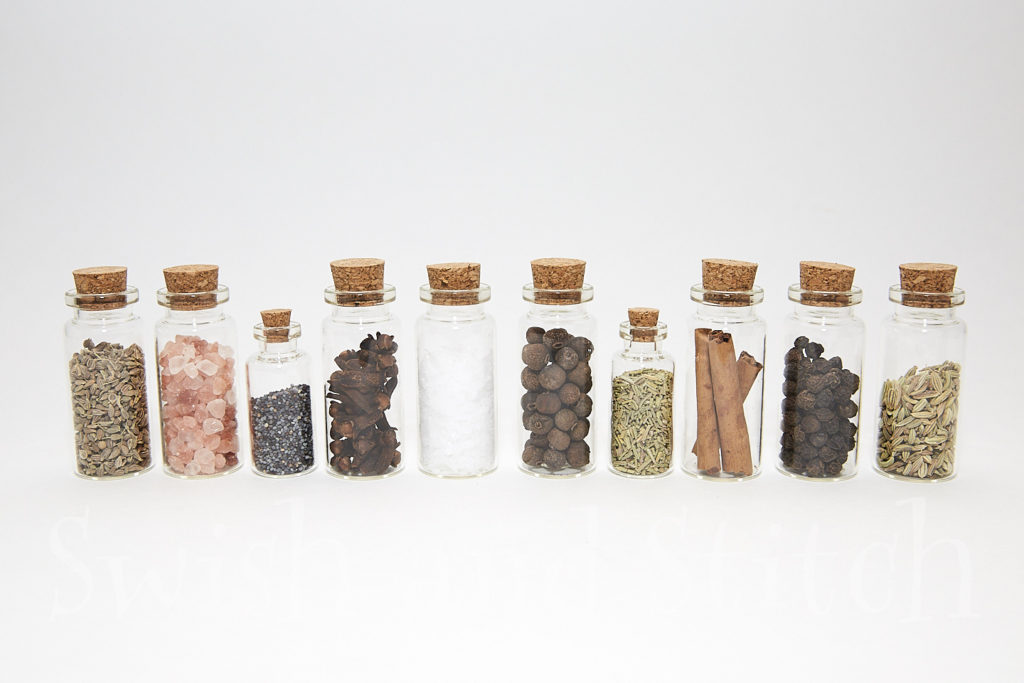
My bottles hold the following (from left to right):
- Anise seed
- Himalayan pink salt
- Poppy seeds
- Cloves
- Flake sea salt
- Allspice
- Rosemary
- Cinnamon sticks
- Whole black pepper
- Fennel seeds
Small Beads
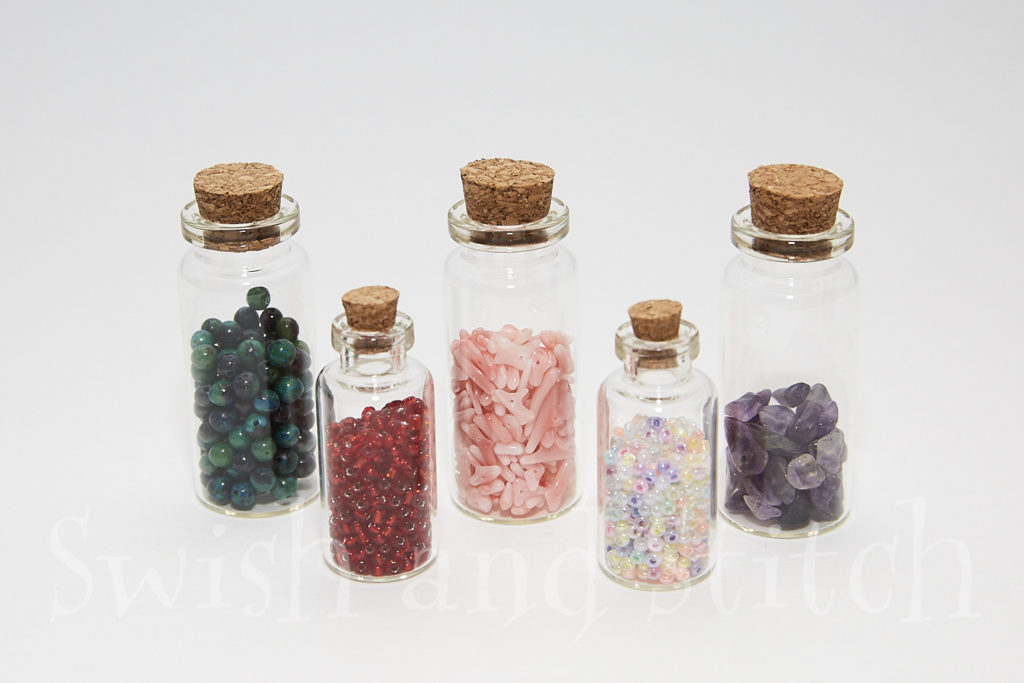
Seed beads and other small beads also work well as potion ingredients. In the picture above, the two small bottles hold glass seed beads. The larger bottles hold (left to right) round azurite/malachite beads, pink coral twigs, and amethyst chips. I found all of them at Michaels.
Wet Potion Ingredient Bottle Ornaments – This is What You Should Not Do
Okay, to be honest, I struggled with these. I read other bloggers’ tutorials and watched videos and still I wasn’t happy with the results I was getting.
Did you ever read the old book in the Berenstein Bears series The Bike Lesson? I’m feeling like Papa Bear right now. “This is what you should not do, so let this be a lesson to you!”
So, here are my fails. Maybe they’ll save you a headache or two.
Clear Glue with Glitter
I dumped a bunch of ultra fine glitter into Elmer’s clear school glue and stirred it around. It looked great! For one evening. After sitting overnight, the glitter had separated from the glue. The glue did not have high enough viscosity to hold the glitter in place.
Clear Glue with Beads
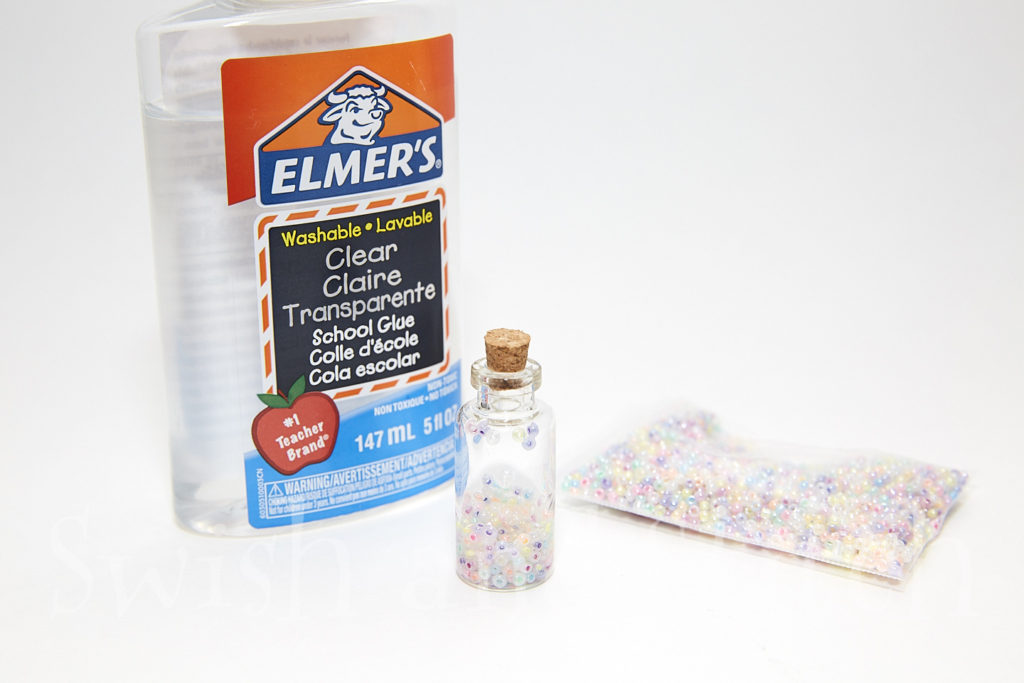
This one’s a little hard to see since I used light colored beads, but um, no. The glue with the beads looks milky for some reason. Not to mention, that if any of the beads get stuck at the top of the bottle, they are glued there. Gravity will not pull them down. It’s up to you, of course, but I recommend skipping this.
Clear Hair Gel with Glitter
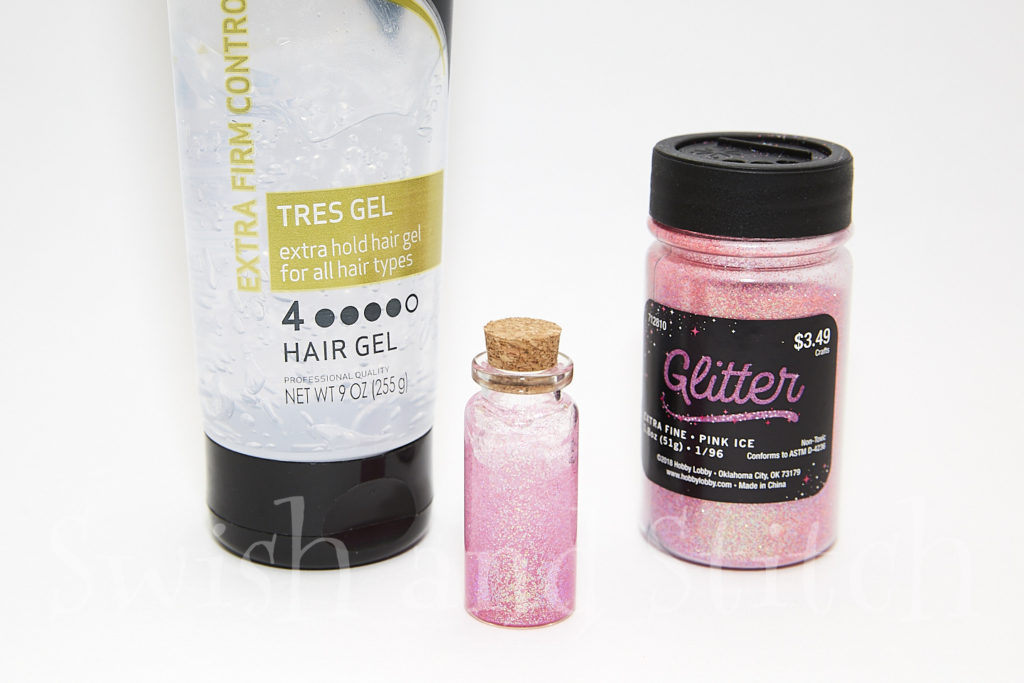
Clear hair gel is definitely a better choice than glue with the glitter. It is viscous enough to hold the glitter in place. It is a little hard to get the glitter stirred into the gel completely. The main thing I don’t like about this option is that some of the gel/glitter mixture stays on the sides of the bottle at the top and doesn’t settle down to the potion level. Nit-picky maybe, but it bothers me.
Wet Potion Ingredient Bottle Ornaments – This Is What You Should Do!
Now that I’ve shown you what not to do, let me show you the two options that I am happy to recommend. Keep in mind, that even with these “good” options, you will need to store your bottles upright to keep them looking their best.
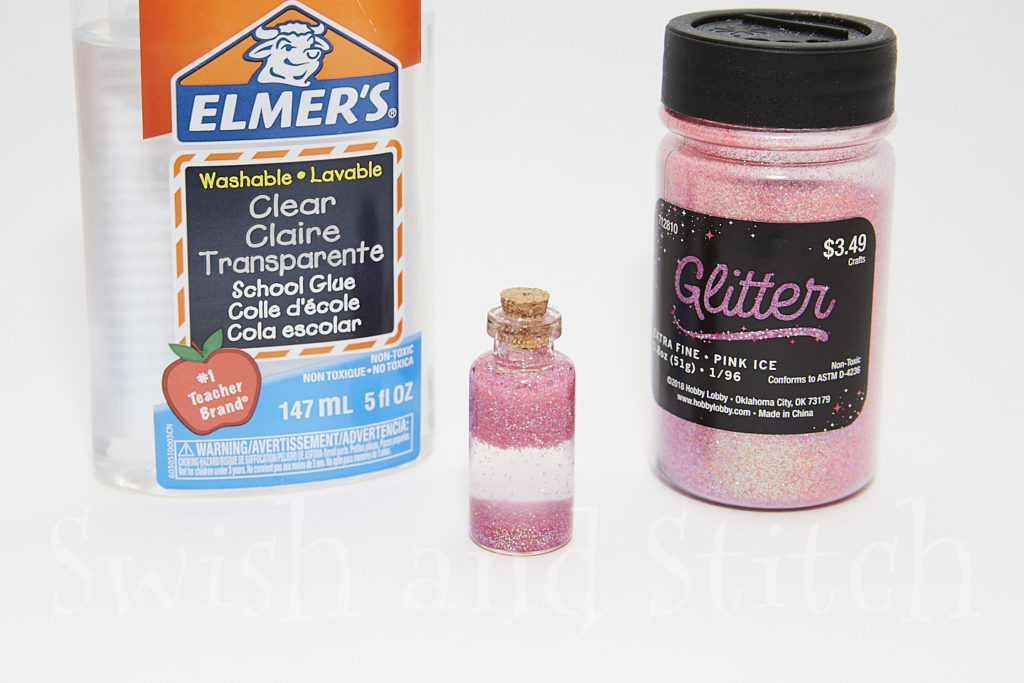
Glitter Glue
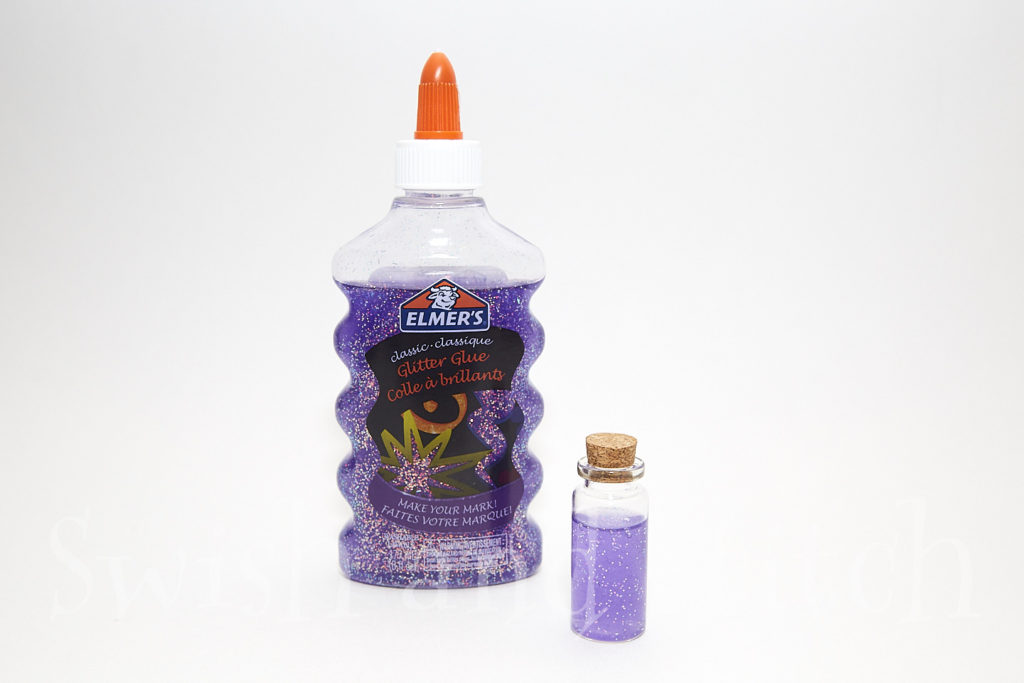
This is the absolute easiest route to making magical glittery potion bottle ornaments. Just find glitter glue that you like and pour it in! Try not to get any on the neck of the bottle as you do. Elmer’s has already figured out the viscosity issue and the glitter stays perfectly, evenly suspended. So easy! A 6-ounce (177 ml) bottle of glitter glue will fill between 17 and 25 bottles, depending on how full you fill your bottles. Not bad!
THERE IS ONE CAVEAT! Do not try to use the glitter glue in the small bottles. It is too thick to pour through the necks of the bottles. Stick to the wider-mouthed 10 ml bottles or larger when using glitter glue.
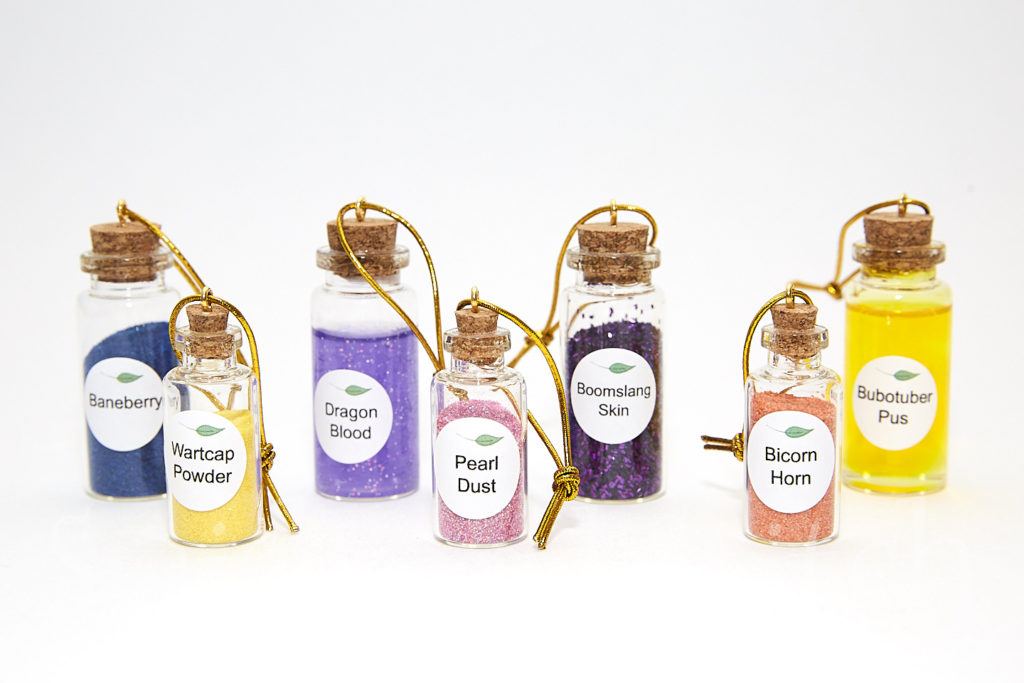
Dyed Clear Glue
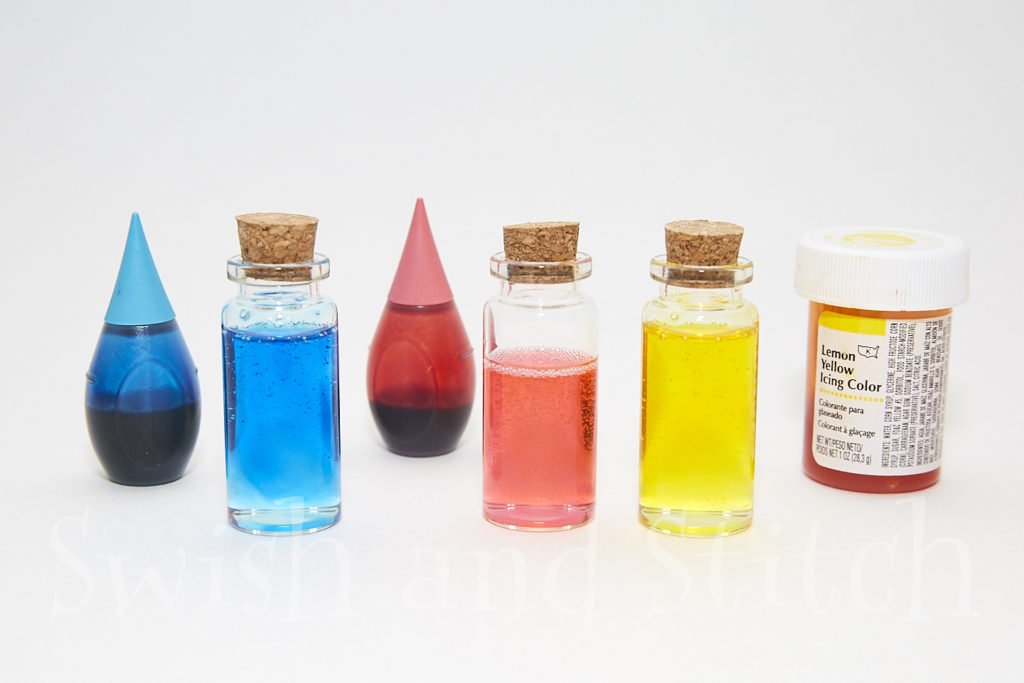
If you want translucent colors of liquid potion ingredients but don’t want to buy lots of bottles of glue, just buy one bottle of clear glue and add dye yourself.
The blue potion could be the Draught of Peace, the pink one looks like Amortentia—the most powerful love potion—and the yellow one could be Felix Felicis—Liquid Luck. And if you stick with undyed clear glue, you have yourself Veritaserum!
NOTE: I’ve read conflicting information on whether or not corks are airtight. I’ve got potion bottles that I made a few years ago in which the potion levels have definitely dropped. So, I’m voting NOT completely airtight. This is probably because these are inexpensive craft bottles with craft corks and may not be the highest quality corks available. The potions should not leak as we will finish the bottles up by gluing the corks in place, but it’s still best to store the bottles upright. These potion bottle ornaments will look great for several years.
I used liquid and gel food coloring to tint my glue. Just know that a little goes a long way! Do not add even one full drop of food dye to one of your little bottles. Instead, follow these steps.
Tint a Small Amount of Glue
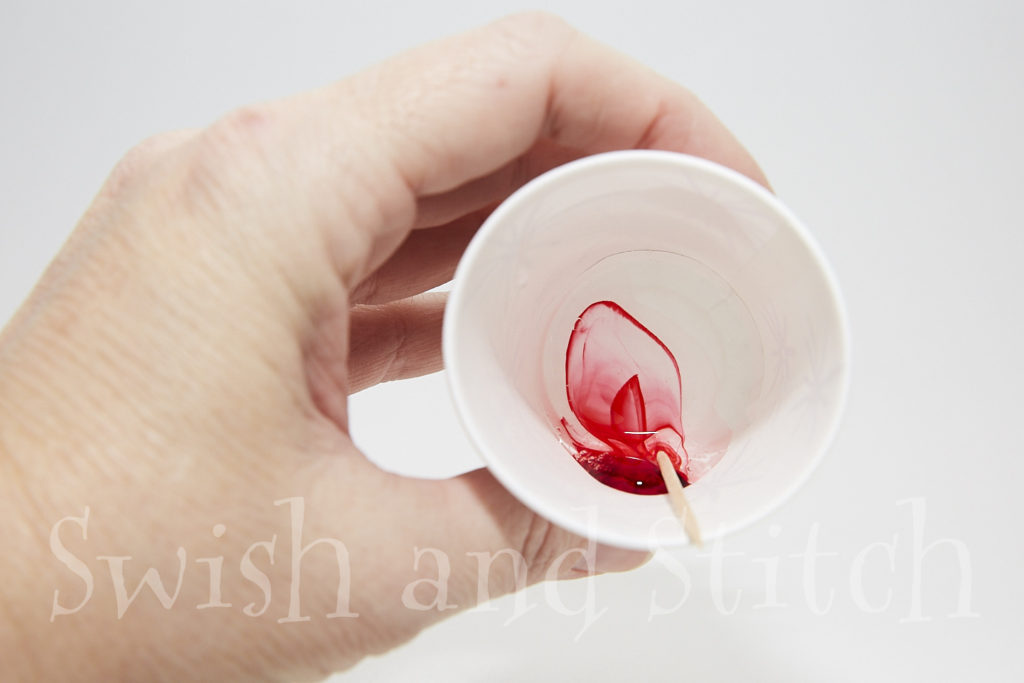
Squeeze a little glue into a small plastic or paper cup. Add one drop of food dye. Use a toothpick to mix it thoroughly.
Partially Fill a Potion Bottle
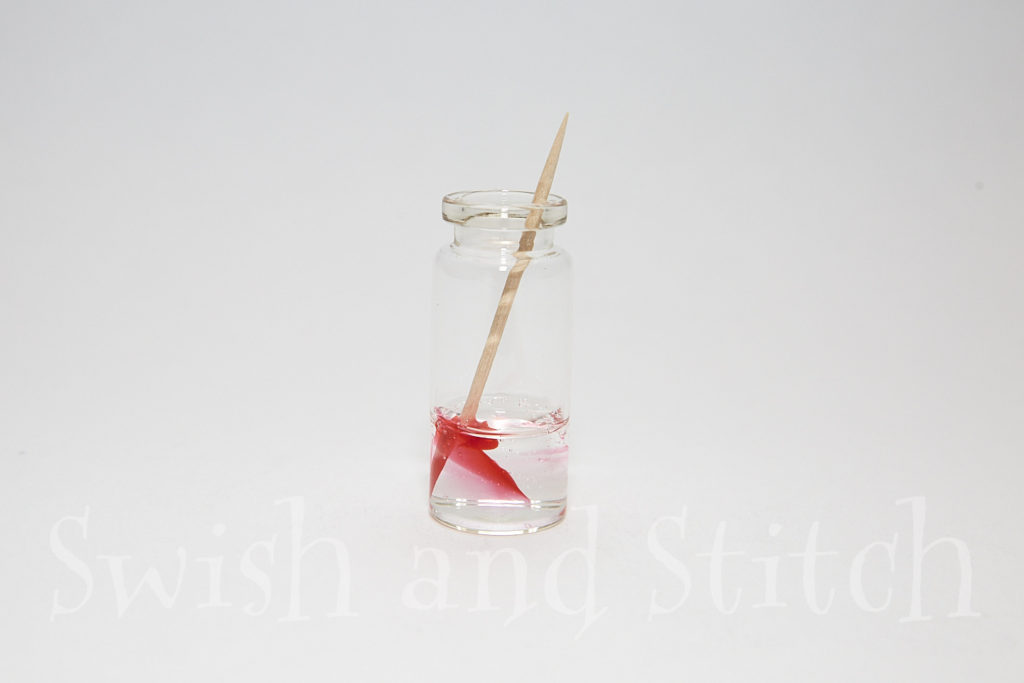
Squeeze some of the clear glue into your potion bottle. Using a toothpick, add just a tiny dab of the colored glue and stir to combine.
Repeat
Add more clear glue as needed to fill the bottle as desired. Add more colored glue for a more intense color. Stir.
Finishing the Harry Potter Potion Ingredients Ornaments
Now that you’ve filled all your potion bottles, there are a few final steps to turn them into ornaments for your miniature Christmas tree.
Glue the Corks in Place
It would be a little awkward, not to mention messy, if your bottles came uncorked and fell off your tree. This is super easy to take care of.
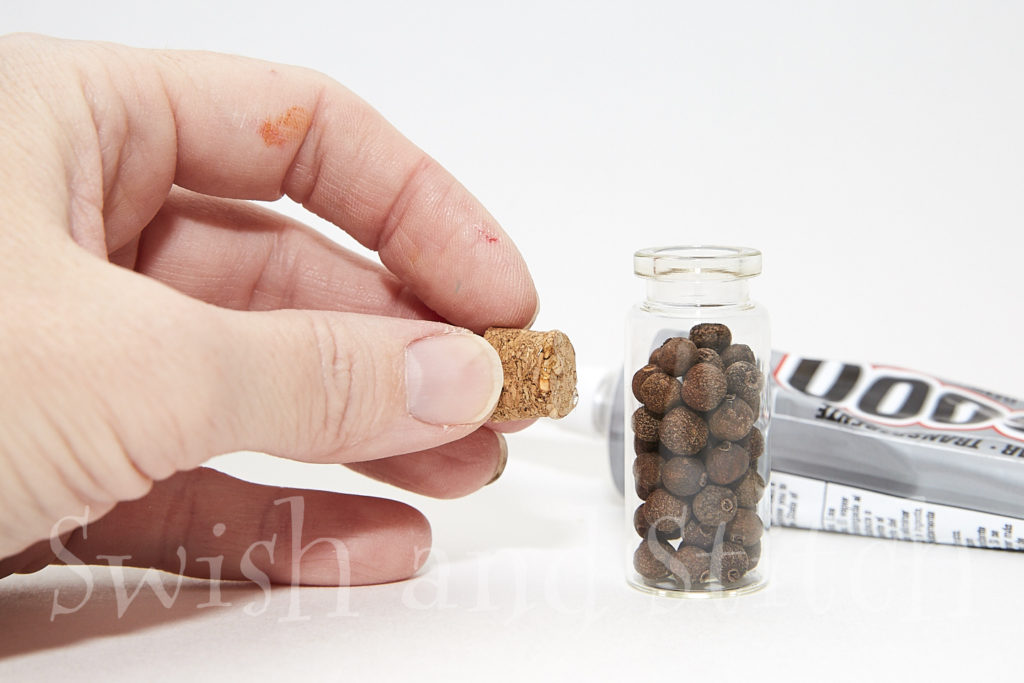
Run a little E6000 glue around the bottom of your cork and press firmly into your bottle. If desired, use a cotton swab or scrap of paper towel to wipe off excess glue before it dries.
Add the Hanger
Similar to some of the other ornaments in the Harry Potter Ornaments Marathon, I chose to insert an eye screw and gold cord to hang my potion bottles. Do not just push the screw into the cork. You need to twist it in, being careful to not move it as you do. You don’t want to break up the cork particles.
I found the easiest way to do this is to hold the eye screw in pliers. Hold the screw vertically, centered on the cork. Then, with your other hand, turn the bottle as you exert gentle downward pressure on the screw.
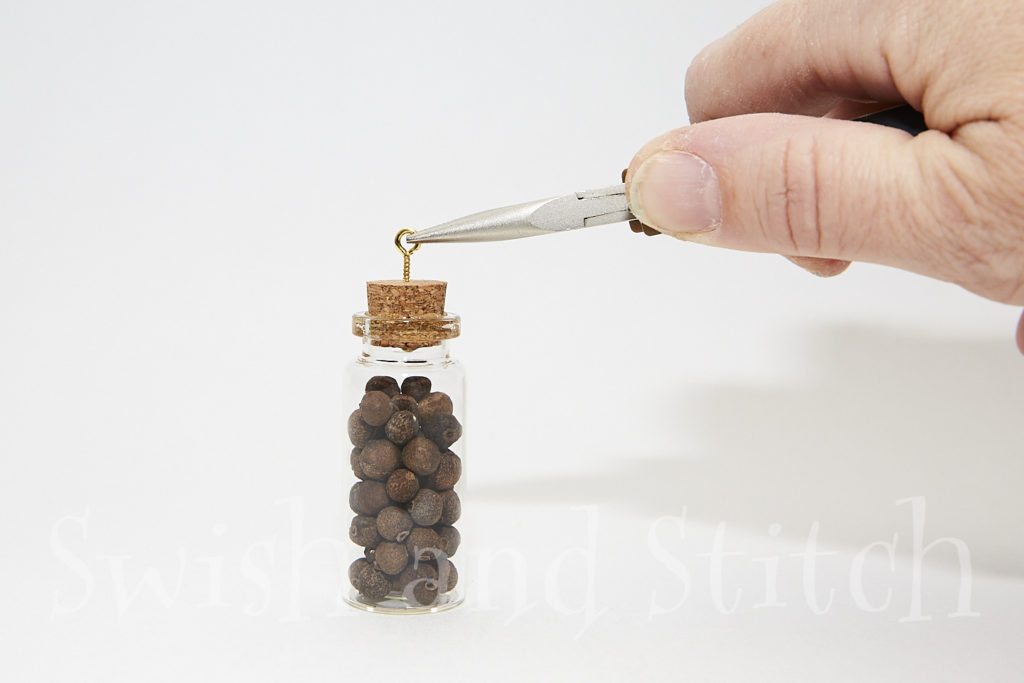
Once the screw is inserted, thread a 6-inch length of gold cord through the eye screw, knot it, and trim.
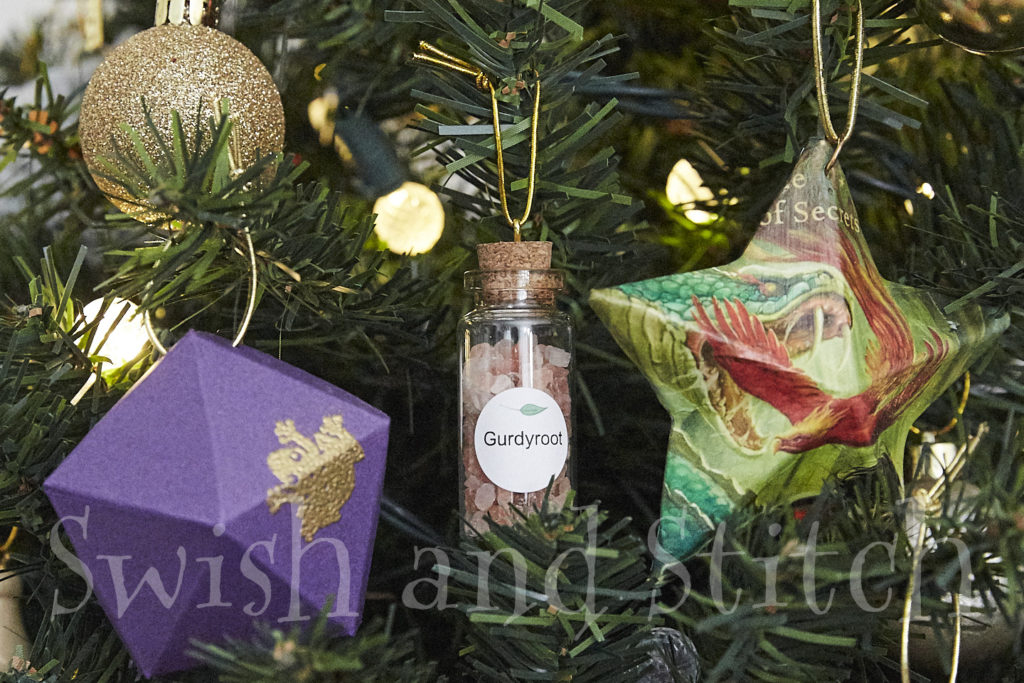
Label the Potion Bottles
This step is completely optional. I think the ornaments look great without labels, but even better with them! Bubotuber pus, anyone? Unicorn hair? Occamy eggshells? Billiwig Wings? I’ve got your back!
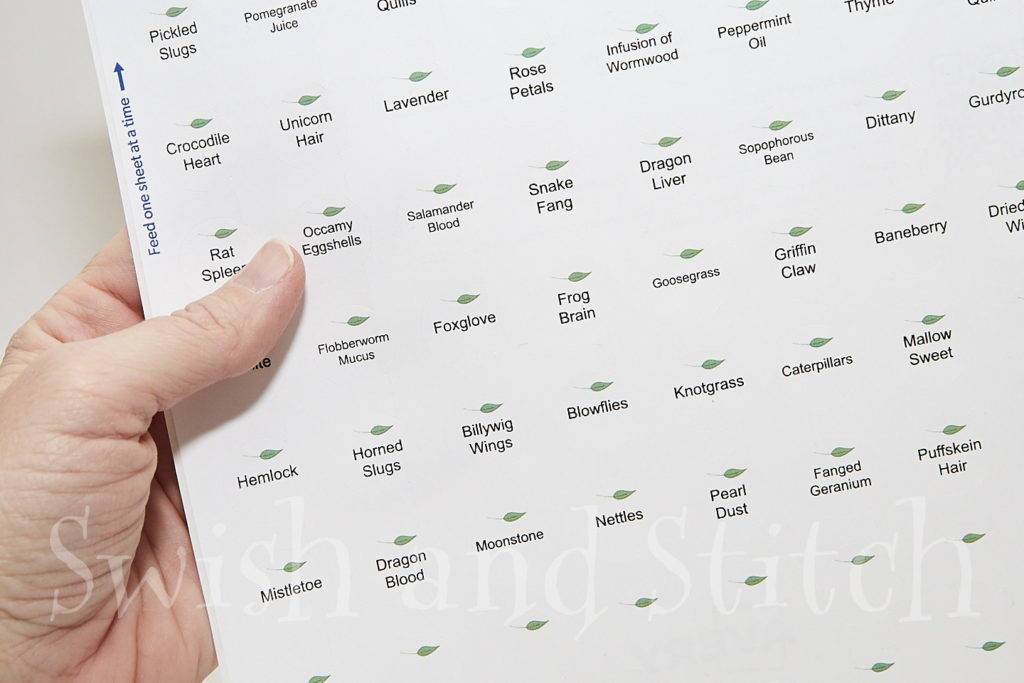
I’ve created labels for my bottles using the Avery 3/4″ diameter Round Labels (4221). The small size works well for these bottles. I also like that they have a unique easy peel pop-up edge, making the sticker so easy to remove from the backing.
I did have problems with their template. Or maybe it’s my printer. Whatever the problem, the images and text did not print centered on my labels even using their online template. I ended up editing each field individually to make them line up.
I’ve included the PDF for you, but use it with the Avery 4221 labels at your own risk! 🙂 Just click on the image below to download. I left two rows of empty labels in case you’d like to write in your own potion ingredients.
Another option would be to print the PDF on a full sheet of sticker paper and then use a 3/4″ hole punch to cut them out. These will be a little harder to peel off the backing, but should give you good results. You could also print on cardstock or other thick paper and glue them to the bottles if you prefer.

I chose to keep the labels simple and clean as if all of the ingredients might have been in a beginning potioneer’s kit from the apothecary in Diagon Alley. And no. When I chose labels for each bottle, I was not going for accuracy. So yes. My dragon’s blood is purple and not red.
Embellish!
I decided not to embellish my potion bottles beyond adding the labels, but there are so many things you could use to dress up your potion bottles, if you like. Consider any of the following.
- Twine
- Ribbon
- Colored wire
- Embroidery floss
- Sequins
- Beads
- Buttons
- Flowers
- Charms
- Jewels
The sky, or more accurately, your imagination’s the limit!
I’d love to see what you create! You can send pictures to lucinda@swishandstitch.com.
Happy crafting!
~ Lucinda